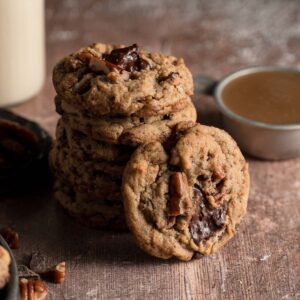
Vegan Brown Butter Chocolate Chip Cookies
The search for the best vegan brown butter chocolate chip cookies ends here! Possibly my best cookie recipe yet! This delicious chocolate chip cookie is made with vegan browned butter, huge chunks of chocolate, and crushed pecans for added texture. It’s crunchy on the outside and has a gooey chocolatey center, that only dreams are made of. These cookies are best paired with a nice tall glass of non-dairy milk, and honestly, you’ll be set for life!
Equipment
- Small saucepan
- Mesh Sieve
- Heatproof bowl
- Sharp knife
- Chopping Board
- Mixing bowls
- Whisk
- Rubber spatula
- Medium-sized cookie scoop
- Parchment Paper
- Rimmed baking sheet
- Baking sheet cover or plastic wrap
- Wire cooling rack
Pro TipIf a recipe calls for it, use a food scale to weigh ingredients in grams for the best results! Use the options below to toggle between cups or grams.
Ingredients
Vegan Brown Butter:
- 226 grams vegan butter (I used Country Crock Plant Butter)
- 125 grams pecans (roughly chopped)
Cookies:
- 113 grams Semi-sweet Baker's Chocolate (roughly chopped)
- 56 grams German Sweet Chocolate (roughly chopped )
- 100 grams granulated sugar
- 150 grams dark brown sugar
- 1 teaspoon fine salt
- 120 grams vegan brown butter (from recipe above)
- 75 grams warm non-dairy milk (I used soy)
- 2 teaspoon pure vanilla extract
- 250 grams all-purpose flour
- 1 teaspoon baking soda
Instructions
Brown Butter:
- Melt the vegan butter and pecans in a saucepan over medium heat. Once it starts to bubble, reduce the heat to low and let it simmer for 15-18 minutes. Near the end, watch it carefully, as the pecans will start to burn if you leave them for too long.
- Pour the butter mixture through a fine-mesh sieve set over a heat-proof bowl. Save the pecans for something else! Allow the brown butter to cool before using or keep it in an airtight container for later.
Cookie Dough:
- Roughly chop up your chocolate bars, and set them aside until ready to use.
- Next, in a large bowl, combine the granulated sugar and dark brown sugar.
- Then, add in the brown butter, pure vanilla extract, and warm non-dairy milk (milk must be warm or it won’t mix well). Whisk it all together until the sugars have dissolved.
- To the bowl, add the all-purpose flour, baking soda, and salt. With a rubber spatula, fold in the ingredients until there is no pockets of dry flour left. Then fold in your chopped chocolate.
Aging The Dough:
- Prepare a small rimmed baking pan with parchment paper. Use a medium-sized cookie scoop or spoon to portion dough into 2-inch mounds and place it on the baking pan. (It’s okay if they are close together, you will not bake them yet.)
- Cover the pan with a pan cover or tightly wrap it in plastic wrap, and place it in the fridge to chill and age the dough for 8-12 hours. I chilled mine for 12 hours, but you can go as long as 48 hours. Just make sure that your dough is covered properly. Do not skip this step, see notes for details.
Bake!
- When you are ready to bake, preheat the oven to 350° Fahrenheit and line two rimmed baking sheets with parchment paper. Distribute the cookies between the two baking pans and space the cookie dough about 2-inches apart.
- Bake for 12 to 13 minutes, or until the edges are just golden. Do not overbake. Allow the cookies to cool on the pan for 10 minutes then transfer to wire cooling rack to cool completely. Serve and enjoy!
Notes
- Measure your flour properly. A common reason baked goods fail is incorrectly measured flour. I always recommend using a scale for accuracy when baking. This greatly improves your chance for success and lessens room for error. My recipes are 100% tested in grams.
- If you’re measuring by cups, avoid scooping the measuring cup directly into the flour. This tends to pack the flour into the cup, resulting in too much flour and a very dense or gummy finished product. Instead, aerate your flour (fluff it with a fork or spoon) and then spoon it into your measuring cups, leveling it with your finger or the back of a butter knife. Keep in mind though, this method is not guaranteed to be accurate.
- Watch this video from King Arthur on how to properly measure your flour if you don’t have a food scale: https://www.youtube.com/watch?v=GUSovVHpqsU
- Keep an eye on your brown butter! Since you are infusing the butter with pecans, there can be a chance that the pecans can burn. Please don't burn it, it won't taste good! Trust me.
- Use your left-over pecans! Don’t throw away the pecans you used to brown your butter. I like to add it to the cookie dough because it gives it a nice texture. But if you don’t like pecans in your cookies, save it for something else! I also like to add it to my oatmeal or salads!
- Use a mix of chocolate! I like to use two different types of chocolate in my cookies, bittersweet and German sweet. And I like the mix of flavors I get when I mix my chocolates. Sometimes having one type of chocolate can be too intense, but that is up to your personal preference!
- Portion your cookie dough before aging it. Because the butter will solidify back in the fridge, you will get a solid block of dough that’s then very hard to portion if it were still in the bowl. It’s much easier to portion out the dough at room temp and place it on a baking sheet, covered in the fridge. Once they are solidified, you can either bake them or place them in a bag, freeze it, and bake them for later.
- Age your cookie dough. What does that mean? It simply means, allowing your cookie dough to rest in the fridge for a period. By doing this, it helps enhance the flavor of the cookie dough, it solidifies the butter, and the sugar recrystallizes. As a result, you get a cookie that is chewier and has a more developed flavor. For this cookie, I do it overnight, but you can let it sit in the fridge for 12-48 hours. However, if you want to bake it on the same day, 4 hours will suffice! But do not skip this step, you won’t regret it!
Tried this recipe?Leave a comment below & tag @flouredframe on social!