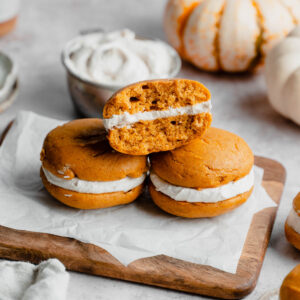
Vegan Pumpkin Whoopie Pies
These are soft and pillowy cakes filled with rich cream cheese frosting. The warmth of the spices will curb all your fall cravings! These are so delicious, you’ll almost forget that they’re vegan.
Equipment
- Rimmed baking sheet
- Parchment Paper
- Mixing bowls
- Whisk
- Cookie scoop or piping bag
- Wire cooling rack
Pro TipIf a recipe calls for it, use a food scale to weigh ingredients in grams for the best results! Use the options below to toggle between cups or grams.
Ingredients
Dry Ingredients:
- 250 grams All-purpose flour (fluffed, spooned, and leveled, see notes)
- 1 teaspoon Salt
- 1 ½ teaspoon Baking powder
- ¼ teaspoon Baking soda
- 1 ½ teaspoon Pumpkin spice
Wet Ingredients:
- 150 grams Non-dairy milk (lukewarm, I used soy)
- 2 teaspoon White vinegar
- 150 grams Brown sugar, lightly packed
- 240 grams Pumpkin puree, not pumpkin pie filling
- 45 grams Vegetable oil, or any neutral oil
- 1 teaspoon Vanilla extract
Cream Cheese Frosting:
- 78 grams Vegan butter (softened at room temperature, I used Country Crock Plant Butter)
- 74 grams Vegan plain cream cheese (softened at room temperature, I used Kite Hill)
- 175 grams powdered sugar (sifted)
- 1 teaspoon Vanilla extract
- 1 teaspoon Pumpkin spice
Instructions
Make the batter:
- Preheat the oven to 350° Fahrenheit, and line a baking sheet with parchment paper.
- In a large mixing bowl, combine the all-purpose flour, baking powder, baking soda, salt, and pumpkin spice. Next, combine the non-dairy milk and vinegar together, and allow it to sit for 5 minutes to curdle.
- Once the milk mixture is ready, add it to a mixing bowl, along with the brown sugar, oil, pumpkin puree, and vanilla extract. Whisk until the mixture is fully combined.
- Add about half of the wet ingredients to the bowl of the dry ingredients, and gently whisk the ingredients together until there are no pockets of dry flour left. Add in the remaining wet ingredients and continue to whisk until well incorporated and you get a nice thick batter.
- Depending on the size you want, you can use a small or medium-sized cookie scoop, and scoop the batter onto the prepared baking sheet leaving about 1-inch of space in between. If you want a neater process, you can use a piping bag to pipe the batter onto the baking pan.
- For smaller whoopie pies bake for 10-12 minutes, for the large size, bake for 20-25 minutes until puffed and lightly golden brown along the edges, or until a toothpick inserted in the center comes out clean.
- Remove the cakes from the oven, and let them sit on the baking sheet to cool for 15 minutes before transferring them to a wire rack.
Making the frosting:
- Using an electric mixer, whip the softened butter on high speed until light and fluffy. Then add the softened vegan cream cheese to the bowl and whip it to combine with the butter.
- On the lowest setting, slowly add the powdered sugar in batches, to evenly combine it with the butter and cream cheese mixture.
- Once the sugar has been mixed in properly, add in the vanilla extract and pumpkin spice, and continue to whip on high until light and fluffy, about 2-3 minutes. Scrape the sides of the bowls as needed.
Assembly
- Once your cakes have cooled completely, scoop or pipe the frosting a good amount on one cake and sandwich it with the other half. Repeat until all the cakes have been filled. Serve and enjoy!
Notes
- Measure your flour properly. My recipes are 100% tested in grams. A common reason baked goods fail is incorrectly measured flour. I always recommend using a scale for accuracy when baking. This greatly improves your chance for success and lessens room for error.
- If you’re measuring by cups, avoid scooping the measuring cup directly into the flour. This tends to pack the flour into the cup, resulting in too much flour and a very dense or gummy finished product. Instead, aerate your flour (fluff it with a fork or spoon) and then spoon it into your measuring cups, leveling it with your finger or the back of a butter knife. Keep in mind though, that this method is not guaranteed to be accurate.
- Mix dry and wet ingredients separately, then combine. By doing this, you give yourself the best chance of evenly distributing all the dry ingredients in the batter.
-
- Add the dry ingredients in batches. This will ensure that the batter is evenly mixed and as a result a smoother texture.
- Do not frost until the cakes have cooled completely. Because the frosting is made of butter, it’ll melt when it comes in contact with heat. Even if you think the outside of the cakes is cool enough, the inside can still be fairly warm. So, make sure you place the cakes on a wire rack so it aerates throughout, and give them the time it needs to completely cool down.
- Use room-temperature butter and cream cheese. This goes without saying, but sometimes people forget. It’s obvious you can’t do anything with cold, hard butter or cream cheese. So letting them get to room temperature will allow them to get soft and be able to mix better.
Tried this recipe?Leave a comment below & tag @flouredframe on social!