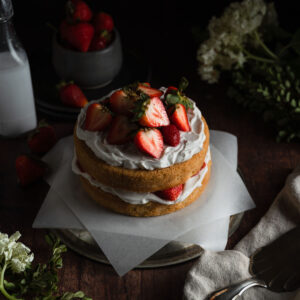
Vegan Strawberry Shortcake
Nothing says summer better than this delicious vegan strawberry shortcake. It's an easy twist to the classic dessert, with layers of vanilla cake, juicy strawberries, and fluffy whipped cream. It's the perfect dessert for summer, and one of the best ways to use fresh strawberries. If you're looking for a light dessert to make for your next summer party, this is the one for you!
Equipment
- Food scale highly recommended
- 2 6-inch cake pans
- Small saucepan
- Measuring spoons
- Mixing bowls
- Whisk
- Wire cooling rack
- Stand mixer or electric hand mixer
- Offset spatula
- Chopping Board
- Sharp kinfe
- Pastry brush
- Serving plate or cake stand
Pro TipIf a recipe calls for it, use a food scale to weigh ingredients in grams for the best results! Use the options below to toggle between cups or grams.
Ingredients
Simple Syrup:
- 50 g granulated sugar
- 50 g water
Cake:
Filling:
- 473 g Silk Dairy-free Heavy Whipping Cream
- 25 g powdered sugar
- 1 teaspoon vanilla extract
- 1 cup fresh strawberries (plus more for topping)
Instructions
Sugar Syrup:
- Bring water and sugar to a boil and boil until sugar has dissolved. Allow to cool at room temperature. Set aside until ready to use.
Cake:
- Before you start, preheat the oven to 350°F. Grease the cake pans with a little bit of oil and line the bottom with parchment paper.
- Next, in a medium-sized bowl, add in the soy milk, vinegar, and vanilla extract. Whisk to combine. Set aside for 5 minutes to curdle (this is vegan buttermilk). Then add in the oil, and whisk together to emulsify.
- Meanwhile, in another medium-sized bowl, add in the all-purpose flour, potato starch, baking powder, baking soda, salt and sugar. Mix until well combined, and set aside until ready to use.
- In the bowl with the dry ingredients, pour in half of the wet ingredients. Gently whisk until combined. Then, add in the remaining half and mix until the batter is very smooth and runny. Evenly distribute the batter to the prepared cake pans. Tap the bottom of the cake pans to release any bubbles from the batter.
- Bake the cakes at 350°F for 20-22 minutes or until a toothpick inserted into the center comes out clean and dry.
- Remove the cakes from the oven, and carefully place them on a wire cooling rack. Allow the cakes to cool in the pan for 10 minutes. Carefully flip the cake pans over the cooling rack to release the cakes. Then, leaving them upside down, allow the cakes to completely cool.
Frosting:
- In a bowl of a stand mixer, whip the dairy-free heavy whipping cream on high for about 2-3 minutes until you reach stiff peaks. Then, add in the powdered sugar and vanilla extract. At low speed, mix all the ingredients. Once combined, whip the cream again on high for another 30 seconds. Cover the bowl and place it in the fridge until ready to use.
Prepping the strawberries:
- Wash and hull 1 cup of strawberries into small cubes. This will be your filling. Grab another ½ cup or more of strawberries and cut them in half only. This will be your topping. Set aside until ready to use.
Assembly:
- When the cakes are completely cooled, it’s time to level them. Take a sharp knife to cut the dome from the top of the cake. I like getting down at eye level to see if it is even and leveled. Repeat for the second cake.
- After, place your desired serving plate and add a small dollop of the frosting on the plate. Place your first cake layer over top. Then take your sugar syrup, and with a pastry brush, dab the sugar syrup over the surface of the cake.
- Next, spread about half of the whipped frosting over the cake. Then add the cubed strawberries on top. Drizzle a bit of the simple syrup over the top of the strawberries.
- With the second layer, flip it over so that the bottom is facing the top. Place it over the strawberries. Then dab some syrup over the top. Spread the whipped frosting, and this time add the halved strawberries on top. Decorate the top however you like! Drizzle a bit more simple syrup on top.
- Place the cake in the fridge for 30 minutes to an hour for the frosting to set before serving! Enjoy!
Notes
- Measure your flour correctly. I test my recipes, 100% in grams. A common reason baked goods fail is incorrectly measured flour. I always recommend using a scale for accuracy when baking. This greatly improves your chance for success and lessens room for error.
- Simple syrup. Cake’s best friend. It simply keeps the cake moist throughout the assembly and decorating stages. Not only that, but it also adds a bit more sweetness to the cake! Don’t worry, it won’t make it overly sweet.
- Potato starch? I know what you’re thinking, potato starch in a cake? Yes, you read that right. Potato starch simply just provides structure and keeps the cake tender and soft. You can substitute it for cornstarch, however, potato starch is slightly smoother and holds moisture a little better than cornstarch.
- Subbing for coconut cream. Chill your coconut cream or coconut milk in the refrigerator overnight making sure not to shake or tip the can to encourage the separation of the cream and water. Remove the coconut cream from the fridge and gently flip it over, so that the bottom is now at the top. Drain out the excess liquid, and you should have the thickened cream at the bottom. Scrape it out and whip it for 1 minute, add in the powdered sugar, vanilla extract, and cream stabilizer.
- Fresh strawberries. Please use fresh, it tastes better in this cake. Better yet, if it's in season, go out to a farm and do some strawberry picking! Do not use frozen strawberries, since it’s frozen it will release a lot of extra liquid and it will just make the cakes too wet and it won’t hold up properly. Fresh is better.
- Cool your cakes before decorating! First, it makes it easier to assemble. Second, it won’t make your frosting melt.
- The small dollop of the filling underneath the cake helps it from sliding around as you decorate it.
Tried this recipe?Leave a comment below & tag @flouredframe on social!