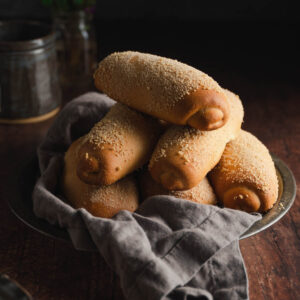
Vegan Spanish Bread (Filipino Senorita Bread)
Vegan Spanish bread, or as my best friend likes to call it, “sandy baby legs”, is a very common pastry in the Philippines. This veganized version stays true to the classic. Fluffy, filled with sweet buttery goodness, baked to golden perfection. The perfect dish to pair with a cup of coffee or tea! Eat it for breakfast, snacks, or even dessert! You won’t want to miss out on this deliciousness.
Equipment
- Food scale highly suggested
- Stand mixer optional
- Large mixing bowl
- Small saucepan
- Heatproof silicone spatula
- Bench scraper or knife
- Butter knife or offset spatula
- Food processor or high speed blender
- Tea towel
- Rolling Pin
- Parchment Paper
- Rimmed baking sheet
- Wire cooling rack
Pro TipIf a recipe calls for it, use a food scale to weigh ingredients in grams for the best results! Use the options below to toggle between cups or grams.
Ingredients
Dough
- 192 grams Non-dairy milk (I used soy)
- 2 teaspoons Instant yeast
- 100 grams Granulated sugar
- 350 grams Bread flour (spooned, leveled and sifted)
- 1 teaspoon salt
- 42 grams Vegan butter (softened)
- 30 grams Unflavored panko breadcrumbs (make sure it's vegan!)
Sweet Buttery Filling
- 56 grams Vegan butter
- 100 grams Brown sugar
- 60 grams Non-dairy milk (luke warm and I used soy)
- 2 teaspoons Bread flour
- 30 grams Unflavored panko breadcrumbs
- ¼ teaspoons salt
- 1 teaspoon vanilla extract
Instructions
Dough
- Combine all of the dough ingredients into a bowl of a stand mixer, including the yeast and softened vegan butter. Knead with the dough hook attachment on medium-low speed for 10 minutes until it forms one cohesive dough. You’ll know when your dough is fully kneaded when it springs back when you lightly press down on it.
- Shape the dough into a ball and transfer to a lightly oiled bowl and cover. Let the dough rise in a warm spot for 1 hour, or until doubled in size.
Filling
- In a small saucepan, melt the butter until bubbly. Then whisk in the brown sugar until it has slightly dissolved in the butter. Next, add in the non-dairy milk and whisk to combine.
- Add in the bread flour, bread crumbs, salt, and vanilla extract. Whisk until fully combined. Cook for another 1 minute until it starts to bubble. Remove from heat and allow to cool.
Assembly
- Before you start, if your bread crumbs are chunky, blitz them in the blender or in a food processor until you get a sand-like texture. Then prep it by pouring it on a plate, and set it aside. Next, prep a large baking sheet with parchment paper, and set it aside until ready to use.
- When your dough has doubled in size, punch down it down and divide it into 6 pieces. Use a food scale for more accuracy. Shape each piece into a ball, cover with a damp tea towel, and allow it to rest for 15 minutes.
- After 15 minutes, on a lightly floured work surface, roll out a piece of dough into a rough 4-inch x 9-inch oval. If the dough is resisting and springing back as you roll, allow it to rest for another 10-15 minutes. See notes.
- Add about a heaping tablespoon of the filling, and evenly spread it across the surface, leaving about a half-inch border all around.
- Starting from the bottom, roll it up while making sure that all ends are sealed. Roll the tops of the dough in the breadcrumbs, and set it aside on a parchment-lined baking sheet, seam side down. Repeat for the rest of the dough and filling.
- Cover with a damp cloth and let it rise again for 30 minutes and preheat the oven to 350° Fahrenheit. Then bake for 20-25 minutes, or until golden brown. Allow the bread rolls to cool over a wire cooling rack. Best served the same day!
Notes
- Measure your flour properly. I test my recipes, 100% in grams. A common reason baked goods fail is incorrectly measured flour. I always recommend using a scale for accuracy when baking. This greatly improves your chance for success and lessens room for error.
- If you’re measuring by cups, avoid scooping the measuring cup directly into the flour. This tends to pack the flour into the cup, resulting in too much flour and a very dense or gummy finished product. Instead, aerate your flour (fluff it with a fork or spoon) and then spoon it into your measuring cups, leveling it with your finger or the back of a butter knife. Keep in mind though, that this method is not guaranteed to be accurate.
- These rolls will last for a week, keep leftovers in an airtight container. Reheat in the microwave, oven, or toaster oven.
Tried this recipe?Leave a comment below & tag @flouredframe on social!