Ready to surprise your loved ones with this Vegan Hidden Heart Chocolate Cake? This impressive cake is super clever but is easier to make than you think. Besides the cool hidden design, this cake is so decadent, chocolatey, moist, and topped with a luscious chocolate glaze. Gift your friends, family, or loved ones with this loving surprise cake!

The inspiration
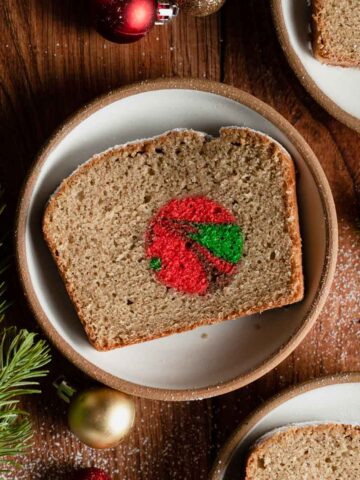
If you don’t know already, I love watching the Great British Bake Off and I gain a lot of inspiration from the show. One of them was a hidden bauble cake which I reimagined and created into a Vegan Eggnog Loaf Cake for Christmas! It’s just so impressive and I love creating baked goods that look difficult to make, but in actuality, it’s quite simple! So, for Valentine’s day, I wanted to do another hidden cake recipe, but this time with a heart.

Ingredient notes
- Soy milk - Soy milk has the most protein of all the non-dairy alternatives, so for baking projects that need a lot of structure (like cakes and bread), this is the best dairy-free option.
- Vegetable oil – Typically for loaf cakes, I use butter, but I find that using vegetable oil makes the cake moist.
- Maple Syrup - Besides adding a bit more sweetness, it also adds to the flavor of the cake.
- Dutch-processed Cocoa Powder - It is smooth, mellow, and deeper in flavor, which makes this cake taste so rich and decadent.
- Instant espresso powder - Chocolate’s best friend. Adding instant espresso is the best way to help boost and enhance the flavor of the chocolate. So don’t skip this!
- Red Gel Food Coloring - Unlike liquid food colors, gel food colors bring a more vibrant and clarity of color without the addition of a lot of unnecessary liquid. Use a vegan-friendly brand, I like using Americolor!

How to make a vegan hidden heart chocolate cake
Preheat the oven to 350° Fahrenheit and grease and line an 8×8-inch square pan and standard loaf pan with parchment paper.
First, make heart cakes! In two separate bowls, combine the wet ingredients and the dry ingredients. Then, add the dry ingredients in batches to the dry ingredients and whisk until smooth.
Pour the pink batter into the prepared baking pan and spread it as evenly as you can.
Bake for 10-12 minutes and allow to cool completely. Cut out as many hearts as you can with a small heart cookie cutter. Set aside until ready to use.
Make the cake batter for the chocolate cake. Evenly spread a bit of batter onto the bottom of the loaf pan, you want about ¼-inch thickness. Then place the heart cakes into it neatly in a row.
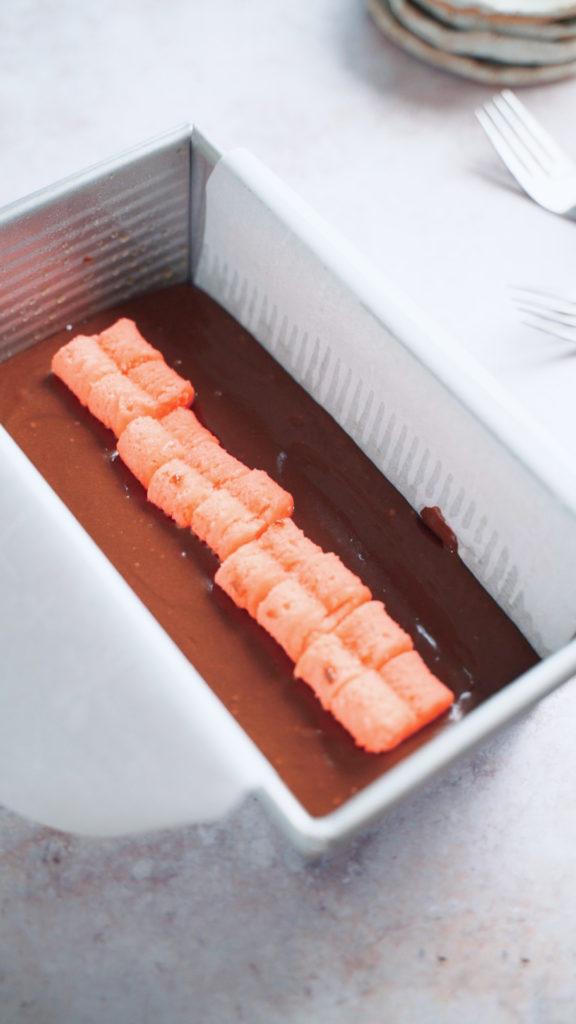
Gently spoon or pipe the remaining cake batter around and on top of the ornaments, making sure they are covered. Place the loaf onto the middle rack of the oven and bake for 40-45 minutes. Allow the cake to cool fully before adding the glaze!


Make the glaze by melting the butter and chocolate in a microwaveable bowl. Then add it into a larger bowl with powdered sugar and vanilla. Whisk until well combined! If it’s too thick add a bit of hot water to thin it out.
Glaze the top of the cake and allow it to harden before serving. Cut into the cake to reveal the surprise inside. Enjoy!
Top tips
- Measure your flour properly. I test my recipes, 100% in grams. A common reason baked goods fail is incorrectly measured flour. I always recommend using a scale for accuracy when baking. This greatly improves your chance for success and lessens room for error.
- If you’re measuring by cups, avoid scooping the measuring cup directly into the flour. This tends to pack the flour into the cup, resulting in too much flour and a very dense or gummy finished product. Instead, aerate your flour (fluff it with a fork or spoon) and then spoon it into your measuring cups, leveling it with your finger or the back of a butter knife. Keep in mind though, that this method is not guaranteed to be accurate.
- Make the heart cake the day before. While this recipe is simple to make, it takes time to make. So, I suggest I make the ornament cake the day before or even a couple of days ahead. Just store the whole cake in the fridge in a zipped bag or saran wrap. When you are ready, you can cut them out and bake the rest of the cake!
- Adding the dry ingredients to the wet ingredients in batches instead of all at once. Doing this ensures that the dry ingredients have thoroughly been absorbed into the batter.

Frequently Asked Questions
- Why do you use soy milk for baking? Soy milk has the most protein of all the non-dairy alternatives, so for baking projects that need a lot of structure (like cakes and bread), this is the best dairy-free option.
- How long does this vegan chocolate heart cake last?
Wrap this loaf cake in plastic wrap or a large zipped bag and store it at room temperature for up to 2 days or 1 week in the fridge. - Can I freeze it?
Yes! It’s best to slice it up and wrap each slice individually. Then store in the freezer for up to 2 months. - Why did my heart cake move?
There could be a couple of reasons why that happened. Either you had too much batter on the bottom of your pan, you didn’t firmly stick the heart cakes to the bottom, or you weren’t gentle as you poured the cake batter around it. - Can I make this gluten-free?
I have not tried baking gluten-free cakes, so I can’t say it’ll work out the same. - Can’t I use any kind of food coloring?
No. Unlike liquid food colors, gel food colors bring a more vibrant and clarity of color without the addition of a lot of unnecessary liquid. Use a vegan-friendly brand, I like using Americolor!
If you enjoyed making this vegan hidden heart chocolate cake, check these out:
If you tried this recipe let me know in the comments below! Don’t forget to follow me on Instagram @flouredframe for more delicious recipes. While you’re at it, don’t forget to tag me whenever you recreate my recipes! Happy baking!
As an Amazon Associate I earn from qualifying purchases.
📖 Recipe

Vegan Hidden Heart Chocolate Cake
Equipment
- 1 ¼ or 1 ½-inch Heart cookie cutter
- 8x8-inch square baking pan
- Parchment Paper
- Measuring spoons
- Mixing bowls
- Whisk
- Silicone spatula
- Wire cooling rack
Ingredients
Heart Cake
- 150 grams Non-dairy milk (I used soy, warm)
- 1 teaspoon White vinegar
- ½ teaspoon Vanilla extract
- 50 grams Vegetable oil ( or any neutral oil)
- 75 grams Granulated sugar
- 125 grams All-purpose flour
- ¼ teaspoon Salt
- 1 teaspoon Baking powder
- ¼ teaspoon Baking soda
- Red gel food coloring (see notes)
Chocolate Cake
- 240 grams Non-dairy milk (I used soy, warm)
- 2 teaspoons White vinegar
- 1 teaspoon Instant espresso powder ()
- 100 grams Vegetable oil, or any neutral oil
- 150 grams Granulated or cane sugar
- 3 tablespoons Maple syrup (Grade A or any dark maple syrup, see notes)
- 250 grams All-purpose flour (fluffed, spooned and leveled, see notes)
- 35 grams Dutch-processed cocoa powder (sifted )
- ½ teaspoon Salt
- 1 ½ teaspoons Baking powder
- ½ teaspoon Baking soda
Chocolate Glaze
- 28 grams Vegan butter (I used Country Crock Plant Butter Sticks)
- 50 grams Semi-sweet chocolate chips
- 120 grams Powdered sugar, sifted
- 1 teaspoon Vanilla
- 2 tablespoons Hot water (only use if needed)
Instructions
Heart Cake
- Preheat the oven to 350° Fahrenheit. Lightly grease and line an 8×8-inch square pan with parchment paper, and set aside until ready to use.
- In a bowl, combine all the wet ingredients, first combine the non-dairy milk and vinegar, and allow the milk to curdle. Then, add in the vanilla extract, vegetable oil, granulated sugar, and a drop or more of red gel food coloring (get it to the desired shade of pink you want!). Mix until well combined and the sugar has been dissolved.
- In another bowl, combine all the dry ingredients, all-purpose flour, salt, baking powder, and baking soda. Mix to combine.
- Pour half of the dry ingredients into the bowl of the wet ingredients, and whisk until just combined. Then add the remaining dry ingredients and continue to whisk until you get a relatively smooth batter.
- Pour the pink batter into the prepared baking pan and spread it as evenly as you can. Bake the cake for 10-12 minutes or until an inserted toothpick comes out clean.
- Remove from the oven and allow it to cool completely before moving on to the next steps. If you are low on time, you can store it in the fridge, wrapped in plastic, until the next day.
- When the cakes are cool, take a small heart cookie cutter and cut out as many hearts as possible. Save the remaining scraps for snacking or you can make some cake pops! Set the heart cakes aside.
Chocolate Cake
- Preheat the oven to 350° Fahrenheit (if it isn’t already on). Lightly grease, and line a standard loaf pan with a long piece of parchment paper. You want it long enough so it hangs over the sides of the pan, as they will act as handles to pull the cake out later on, set aside until ready to use.
- In a bowl, first combine the warm non-dairy milk, vinegar, and instant espresso. Wait until the espresso has dissolved and the milk mixture has curdled. Then, add in the vanilla extract, vegetable oil, and granulated sugar (yes this is a wet ingredient). Mix until well combined and the sugar has been dissolved.
- In another bowl, combine all the dry ingredients: all-purpose flour, dutch-processed cocoa, salt, baking powder, and baking soda. Mix until well combined.
- Add ⅓ of the dry ingredients to the bowl of the wet ingredients and mix until combined. Add another ⅔ of the dry ingredients and repeat. Finally, add in the remaining ⅓ of the dry ingredients and mix until the batter is very smooth.
Assembly
- Evenly spread a bit of batter onto the bottom of the loaf pan, you want about ¼-inch thickness. Then place the pink heart cakes into it neatly in a row, making sure not to leave any gaps in between. Leave space in the front and back of the row of heart cakes. Make sure that the cakes are pressed into that batter.
- Gently spoon or pipe the remaining cake batter around and on top of the pink heart cakes, making sure they are covered. Transfer the loaf pan onto the middle rack of the oven and bake for 35-40 minutes or until an inserted toothpick comes out clean.
- Remove the loaf cake from the oven and let it cool in the pan for 15 minutes. Then with the parchment paper, carefully pull it out and transfer it to a wire rack. Allow the cake to cool fully before adding the glaze.
Glaze:
- In a small microwaveable bowl, melt the chocolate and butter together for 1 minute. Carefully mix until all the chocolate has melted together in the butter.
- In a medium-sized bowl, sift in the powdered sugar. Then add in all the melted chocolate and vanilla extract and whisk until combined. If you find that the texture is too thick, add small amounts of hot water. Continue to add small amounts of hot water until thinned as desired. If you happen to find the texture is too thin, add a little more powdered sugar. If it’s too thick, add more hot water.
- Slowly drizzle the chocolate glaze over the cake. Allow the glaze to harden before serving. This will depend on both the temperature of the glaze and the room. Cut into the cake to reveal the surprise inside and enjoy!
Notes
- Measure your flour correctly. I test my recipes, 100% in grams. A common reason baked goods fail is incorrectly measured flour. I always recommend using a scale for accuracy when baking. This greatly improves your chance for success and lessens room for error.
- If you measure by cups, avoid scooping the measuring cup directly into the flour. This tends to pack the flour into the cup, resulting in too much flour and a very dense or gummy finished product. Instead, aerate your flour (fluff it with a fork or spoon) and then spoon it into your measuring cups, leveling it with your finger or the back of a butter knife. Keep in mind though, that this method is not guaranteed to be accurate.
- Why do you use soy milk for baking? Soy milk has the most protein of all the non-dairy alternatives, so for baking projects that need a lot of structure (like cakes and bread), this is the best dairy-free option.
- Maple Syrup. Because I used a darker grade of maple syrup, it has more of a caramelly flavor which works well in this cake. Not only that, but it also adds a touch more sweetness. If you can't find maple syrup, you can also use dark agave syrup. Try not to skip this ingredient!
- How long does this vegan chocolate heart cake last? Wrap this loaf cake in plastic wrap or a large zipped bag and store it at room temperature for up to 2 days or 1 week in the fridge.
- Can I freeze it? Yes! It’s best to slice it up and wrap each slice individually. Then store in the freezer for up to 2 months.
- Why did my heart cake move? There could be a couple of reasons why that happened. Either you had too much batter on the bottom of your pan, you didn’t firmly stick the heart cakes to the bottom, or you weren’t gentle as you poured the cake batter around it.
- Can I make this gluten-free? I have not tried baking gluten-free bread, so I can’t say it’ll work out the same.
- Gel food coloring. Unlike liquid food colors, gel food colors bring a more vibrant and clarity of color without the addition of a lot of unnecessary liquid. Use a vegan-friendly brand, I like using Americolor!
- You can make the heart cake the day before. While this recipe is simple to make, it does take time to make. So, I suggest I make the heart cake the day before or even a couple of days ahead. Just store the whole cake in the fridge in a zipped bag or saran wrap. When you are ready, you can cut them out and bake the rest of the cake!
- Adding the dry ingredients to the wet ingredients in batches instead of all at once. Doing this ensures that the dry ingredients have thoroughly been absorbed into the batter.

Leave a Reply