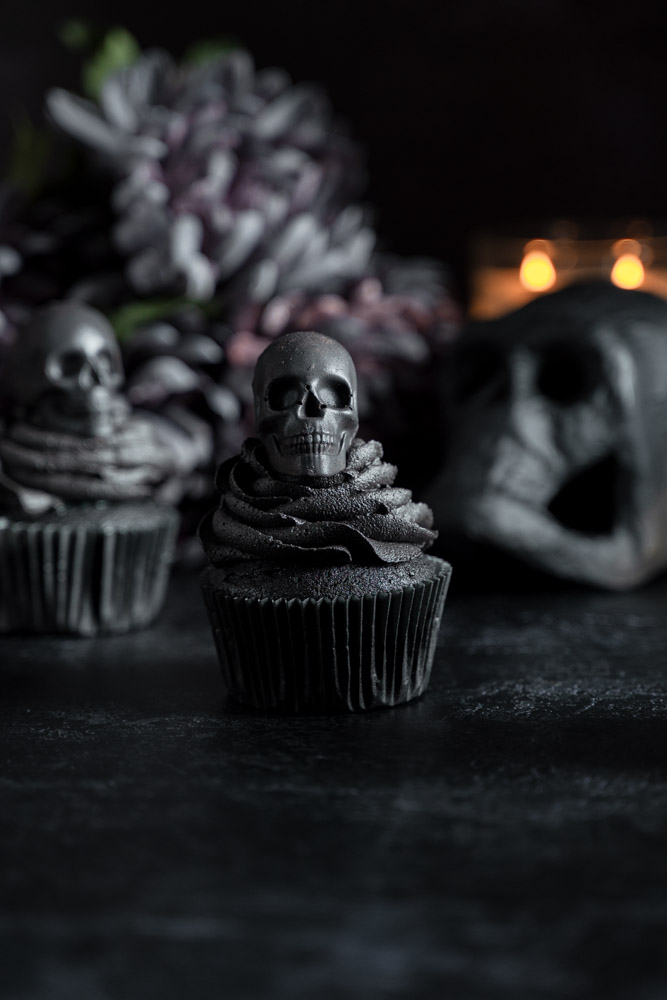
Get ready for the Halloween season with these delicious spooky vegan black cocoa cupcakes! Firstly, these are the best cupcakes you'll ever make for spooky season. They use my vegan black velvet cupcakes as a base, and they're super moist and chocolatey with a hidden surprise inside. What's more, they have a beautiful rich black color that makes them perfect for any upcoming Halloween parties.
What you'll need to make these spooky vegan black cocoa cupcakes
This is based on my vegan black velvet cupcakes, so if you want the full recipe you can check it out here. The Halloween touches are what this blog post is about. Come back to this post once you have the frosting and cupcakes already prepped!
- Semi-sweet chocolate - You'll need some fairly high-quality chocolate to melt and form the skulls out of. Try not to use chocolate chips, as they're made for baking and not for melting. My favorite brand to use is Baker's Chocolate.
- Vegan instant vanilla pudding mix - This is the secret inside these spooky cupcakes, delicious vanilla pudding with a bit of green food coloring. My favorite brand to use is Jell-O Vanilla Instant Pudding Mix because they're accidentally vegan!
- Green gel food coloring - Gel food coloring will be used for the frosting. It’s also formulated so that you get a vibrant color while keeping the consistency of the buttercream. My favorite gel food coloring to use AmeriColor, they are vegan-friendly!

Top tips
For the chocolate skulls
- Follow the two-day schedule of my vegan black velvet cupcakes - Make the chocolate skulls on the first day, along with the frosting, and the green pudding filling on the next day with the cupcakes.
- Wear food-safe gloves - Melting chocolate can get very messy, use food-safe gloves for less mess and less excess handwashing.
- Use a baking pan - Use a baking pan with raised edges to catch any drips and mess as you fill the molds with chocolate. This will save your counters from getting messy!
- Black lustre dust - We all know that chocolate is brown and not black. To fix that, we use black lustre dust to make them look black on the outside.
For the filling
- Core the center of the cupcakes - To easily do this, you can use an apple corer, a small cookie cutter, or even the wide end of a large piping tip. Be sure to leave some of the bottom of the cupcake intact!

Frequently asked questions
- Do I need to make the chocolate skulls? No! This is for those who want to challenge themselves by making a cool-looking dessert for Halloween. You can absolutely skip the chocolate skulls and switch it for Halloween sprinkles. The main star in this is really the green filling.
- Why use gel food coloring? Gel food coloring is way more concentrated in color than liquid food coloring. Meaning, you don’t need to use much of it to get a vibrant color. It’s also formulated so that it won’t affect the consistency or flavor of the buttercream. My favorite gel food coloring to use AmeriColor, they are vegan-friendly!
- Why can’t I use chocolate chips to melt chocolate? Chocolate chips have stabilizers in them, which help retain their shape. This is why they keep their shape in your cookies when they come out of the oven. These stabilizers are what keeps them from melting completely and evenly. Rather than a smooth chocolate, you’ll wind up with a lumpy and uneven mixture.
- How long will these last for? These cupcakes will last in the fridge for up to 3 days. However, they taste best when served at room temperature! I like to let them sit at room temperature for about an hour before serving.
- Do I need to split the process into two days? Yes, the frosting and chocolate skull need an overnight rest before you use it. This also helps you from baking all day and cleaning all day!

If you liked this spooky vegan black cocoa cupcakes, check these out:
If you’ve tried this recipe out let me know in the comments! Don’t forget to follow me on Instagram @flouredframe and don’t forget to tag me when you create my recipes! Happy baking!
📖 Recipe

Spooky Vegan Black Cocoa Cupcakes
Ingredients
- Click here for my vegan black velvet cupcakes recipe. This recipe has a two day schedule and these add ons will follow that.
Chocolate skulls
- Semi-sweet chocolate for melting (do not use chocolate chips, see notesUse (2 bars roughly chopped) Baker’s Chocolate or (1 ¼ cup) Chocolate Wafers)
- Piping bag or squeeze bottles
- Black Lustre Dust optional (see notes)
Equipment
- Silicone Skull Molds
- Microwave-safe bowl
- Rubber spatula
- Piping bag or squeeze bottle
- Powder brush for Black Lustre Dust
- Food safe gloves
Green Pudding Filling
- ¼ cup – instant vegan vanilla pudding mix (I used Jell-O Brand (They’re accidentally vegan!))
- 4 tablespoons (add more if needed – non-dairy milk, I used soy)
- AmeriColor Green gel food coloring (see notes)
Equipment:
- Whisk
- Small mixing bowl
- Apple corer / small cookie cutter / the wide end of a large piping tip
- Spoon / piping bag / squeeze bottle to fill the cupcakes
Instructions
Day 1 (Make with Frosting):
Chocolate skulls
- Have your silicone skull mold ready and make sure that it is completely sealed on all sides and especially in the center of the mold. The mold has connectors in the center, and if they are not sealed together, the chocolate will flow out. (The first time I did this, it was a mess…chocolate everywhere…)
- Pro tip: Wear food-safe gloves for less mess.
- Melting chocolate: Place the chocolate into a microwave-safe bowl. Melt the chocolate into 30-second increments, stirring in between. When you get to a point where you have half melted chocolate and half whole chocolate, stop there. Continue to mix until all the chocolate has melted. This is tempering chocolate. See notes for more info.
- Pour the chocolate into a piping bag and cut the tip off or use a squeeze bottle. Squeeze the chocolate into the skull mold. Gently tap the mold on the counter to release any air bubbles.
- Pro tip: Use a baking pan with raised edges to catch any drips and mess as you fill the molds with chocolate.
- Place into the freezer overnight. The next day, gently remove the chocolate from the mold with clean, dry hands (you can also use food-safe gloves).
- This next step is optional (and if you want to be extra fancy), since chocolate is obviously brown, you can use black lustre powder to make the chocolate skulls black. Pour a bit of the black lustre dust into a bowl, and dip your powder brush into it. Carefully start tapping the lustre dust all over the chocolate skulls. Watch this video for a visual tutorial.
- Pro tip: Use food-safe gloves for this, the powder will get all over your hands.
Day 2 (Make with cupcakes):
Green pudding filling
- To a bowl, add ¼ cup of the vanilla instant pudding mix and add 1 tablespoon of non-dairy milk at a time. Mix until you reach a pudding consistency, then add a drop of green gel food coloring and continue to mix until well combined. Set aside.
Assembly:
- Make sure your cupcakes are cooled. Core the center of each cupcake with an apple corer, a small cookie cutter, or even the wide end of a large piping tip. You want to be sure to leave some of the bottom of the cupcake intact. Otherwise, when someone peels the liner away they might have quite the mess on their hands with filling coming out the bottom!
- Fill each cupcake with the green filling. You can either spoon it in, using a piping bag or a squeeze bottle.
- Pipe a nice tall swirl of frosting over the cupcakes and top it off with a chocolate skull. Enjoy!
Notes
- Why can’t I use chocolate chips to melt chocolate?
Chocolate chips have stabilizers in them, which help retain their shape. This is why they keep their shape in your cookies when they come out of the oven. These stabilizers are what keeps them from melting completely and evenly. Rather than a smooth chocolate, you’ll wind up with a lumpy and uneven mixture. - Tempering chocolate:
Tempering chocolate gives chocolate a smooth and glossy finish and keeps it from easily melting on your fingers. This method of having half melted and half whole chocolate is a simpler way to temper chocolate. If you just melt all the chocolate, it makes it unstable and will result in dull streaky chocolate. So having half whole chocolate will keep the chocolate stable, this having tempered chocolate. - Black Lustre Dust:
Normally for this kind of recipe, folks would use colored candy melts, which would make life easier. Unfortunately, candy melts are not vegan and do have dairy in them. The alternative for this recipe is that we use melted dairy-free chocolate, but we all know that chocolate is brown and not black. To fix that, we use black lustre dust to make them look black on the outside. Yes, this is an added step, and if you don’t care how they look you can totally skip this step. - Why use gel food coloring?
Gel food coloring is way more concentrated in color than liquid food coloring. Meaning, you don’t need to use much of it to get a vibrant color. It’s also formulated so that it won’t affect the consistency or flavor of the buttercream. My favorite gel food coloring to use AmeriColor, they are vegan-friendly! - Do I need to make chocolate skulls? No! This is for those who want to challenge themselves by making a cool looking dessert for Halloween. You can absolutely skip the chocolate skulls and switch it for halloween sprinkles. The main star in this is really the green filling.

Leave a Reply