“He had never had any money for candy with the Dursleys, and now that he had pockets rattling with gold and silver he was ready to buy as many Mars Bars as he could carry – but the woman didn’t have Mars Bars. What she did have were Bettie Bott’s Every Flavor Beans, Drooble’s Best Blowing Gum, Chocolate Frogs, Pumpkin Pasties, Cauldron Cakes, Licorice Wands, and a number of other strange things Harry had never seen in his life. Not wanting to miss anything, he got some of everything and paid the woman eleven silver Sickles and seven bronze Knuts."
- Harry Potter and the Philosopher’s Stone, JK Rowling
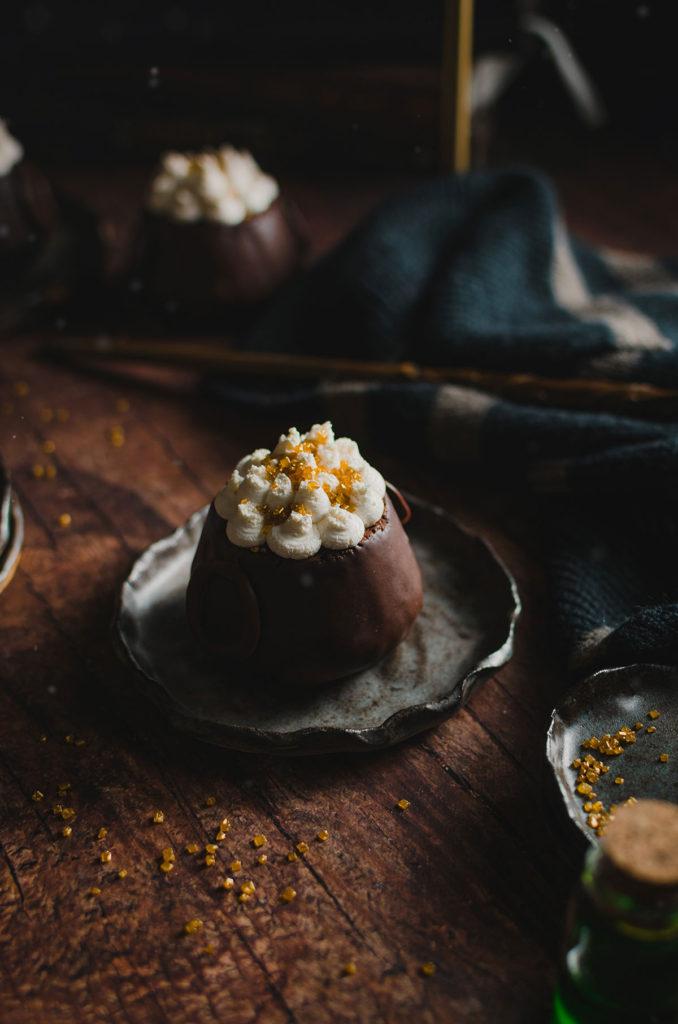
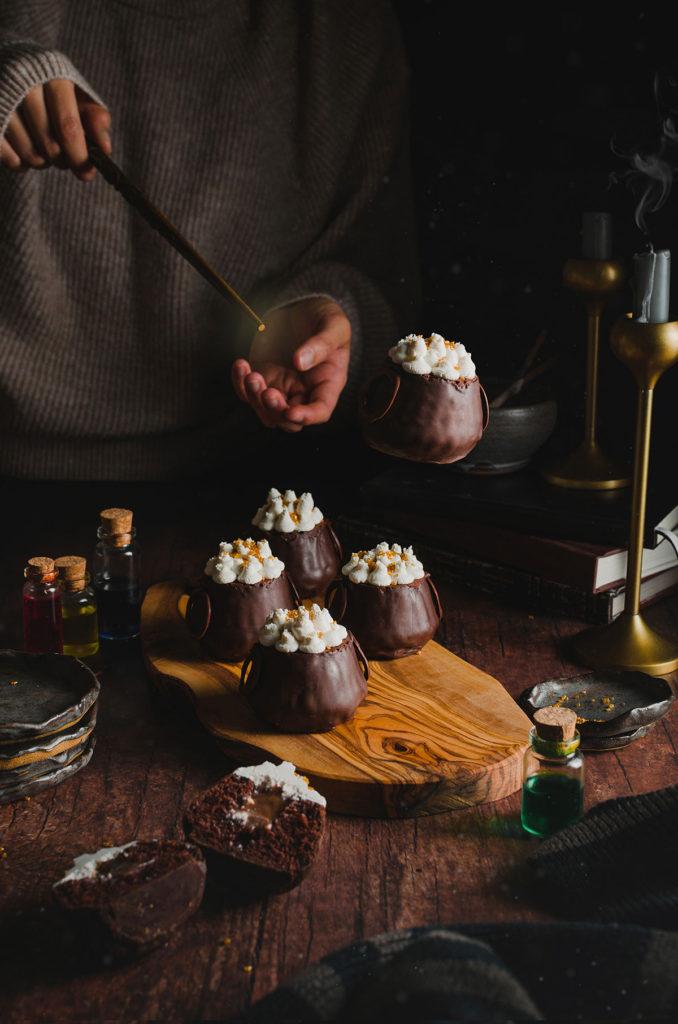
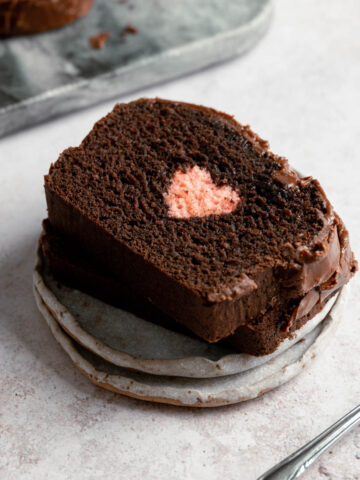
So, cauldron cakes are quite elusive. In the books, it’s been mentioned a few times, but it’s never described as to what it would look like. And in the movies, it’s never shown or mentioned at all! So how do I know what it looks like? Well, I don’t, but that’s the fun thing about food in literature, it’s really up to our imagination. There are no rules when it comes to our imagination, and for me, this is how a cauldron cake would look like. These cute little cakes are coated in chocolate, filled with luscious pudding, and topped off with a bit of buttercream and golden sprinkles. These cakes do take a bit of extra love to make, but in the end, they are worth it.

If you can’t tell already, I’m a pretty big Harry Potter fan. I’ve got a collection of books, DVDs, and even wands. I’ve even gone as far as hosting Harry Potter-themed dinner parties. Yeah, that’s right, I’m a nerd, but I’m a proud nerd! I’ve already tried making treacle tarts, butterbeer, and pumpkin pasties (recipes that I will be posting in the near future). With cauldron cakes, it’s always been a mystery to me. Upon my research, a lot of folks have created recipes that were similar to one another. So what I did was I took inspiration from those, made it my own, and added a few things - while still keeping it fairly simple.
How to make vegan cauldron cakes:
- Make the pudding and set it aside to cool.
- Bake the chocolate cupcakes, and allow them to fully cool before adding the chocolate coating.
- Make the buttercream, set it aside until ready to use.
- Trim the tops of the cupcakes so they can sit flat upside down, which will resemble a cauldron.
- Cover the cupcakes with melted chocolate. Set in the fridge to harden.
- Make chocolate handles, optional, but completes the look of the cauldron. Also, set this in the fridge to harden.
- Hollow out the centers of the cupcakes, and fill them with chocolate pudding.
- Pipe dollops of buttercream, to resemble smoke coming from the cauldron.
- Finish it off with some golden sprinkles, to add the magical vibes.

Top tips to make cauldron cakes:
- Schedule your day accordingly. These cauldron cakes do take a bit of time to make, so if you’re making these for an event, I highly suggest making these a day ahead, or clear your schedule and start early.
- Follow the recipe accordingly. The recipe is divided up into sections, and for good reason. I’ve written this recipe so that while you’re waiting for something to bake or cool, you can be prepping something else. It makes assembly easier.
- Use a silicone pan or silicone cupcake liners. Using silicone cupcake pans/liners are not only reusable but since the batter doesn’t stick to silicone as they bake. As a result, they come out having a smooth exterior. Unlike paper liners, the batter will bake onto them and they also will have ridges, which don’t look as nice for a final product. However, you don’t need to go out and buy a silicone cupcake pan or liners, but if you do use the paper liners, just keep in mind that they will look a bit different.
- Make space for a baking pan in your fridge. We will need the chocolate coating to set in the fridge, and the way to do this is to carefully transfer the cakes is to put them on a parchment-lined baking pan. So do this before you start assembling your cauldron cakes.
- Use your hands to hold the cupcakes as you coat them with chocolate. This will undoubtedly get messy. I’ve tried using a fork and a chopstick to hold the cakes as I did this, but I found that it kept sliding off. So I just used my hands for more stability. You can wear food-safe gloves if you prefer.
- Drag your friends or family to help! Since this recipe takes a bit of time, it’s nice to have a couple of your friends or family help you out. Create an assembly line, one can coat the cakes with chocolate, while another can fill it up with pudding, etc. Make it fun!

So, if you tried this recipe, let me know what you think in the comments below! You can also share it with me on Instagram, just tag @flouredframe. I would love to see your recreations! Happy baking!
If you liked this recipe, check these out:
As an Amazon Associate I earn from qualifying purchases.
📖 Recipe

Vegan Cauldron Cakes
Equipment
- Food scale highly recommended
- Mixing bowls
- Whisk
- Plastic wrap
- Cupcake liners I used silicone cupcake liners
- Rubber spatula
- Electric hand mixer or stand mixer
- Rimmed baking sheet
- Parchment Paper
- Spoon
- Food-safe gloves optional
- Piping bags
- Medium round piping tip
Ingredients
Pudding filling
- 240 grams soy milk
- 1 ½ tablespoons cornstarch
- 1 tablespoon Dutch-processed cocoa powder
- ½ teaspoon instant espresso (optional )
- ¼ cup granulated sugar (add more if you want it sweeter)
- ½ teaspoon vanilla extract
- ½ teaspoon salt
Cake
- 177 grams non-dairy milk, lukewarm
- ½ teaspoon vinegar
- 2 ½ tablespoons vegetable oil
- 15 grams maple syrup
- 128 grams all-purpose flour
- 100 grams granulated sugar
- 3 tablespoons Dutch-processed cocoa powder ()
- 1 teaspoon instant espresso ()
- ½ teaspoon baking powder
- ¼ teaspoon baking soda
- ½ teaspoon salt
Chocolate coating and decorations:
- 1 cup Semi-sweet Baker’s chocolate (roughly chopped )
- 1 teaspoon organic refined coconut oil
Instructions
Pudding:
- In a small mixing bowl, combine non-dairy milk, cornstarch, cocoa powder, espresso powder (if using), maple syrup, vanilla extract, and salt. Mix until the cornstarch and cocoa powder has fully dissolved.
- Transfer the mixture to a saucepan, and place over medium heat.
- Cook, while constantly stirring, until the mixture is thick. If it starts to bubble, remove it from the heat.
- Transfer to a bowl, and place a piece of plastic wrap directly on the top of the pudding. This will prevent skin from developing. Allow it cool at room temperature, and set aside until ready to use.
Cake:
- Preheat the oven to 350° Fahrenheit. Lightly grease a silicone muffin pan or silicone liners. (You can also use paper liners, but they will make the cakes look different)
- Combine the lukewarm non-dairy milk and vinegar. Mix and set aside for 5 minutes, this will be your buttermilk, it will curdle and thicken.
- In a large bowl, sift your flour, sugar, instant espresso/coffee (if using), dutch-processed cocoa powder, baking powder, baking soda, and salt. Whisk together to combine.
- To your buttermilk, add vanilla extract, oil, maple syrup, and whisk until fully emulsified.
- Combine wet ingredients with the dry ingredients, and with a spatula gently fold them together. Careful not to over mix, some clumps are okay. You should have a slightly thick batter.
- Fill your silicone pan or liners ¾ of the way full. Smooth the tops and tap the pan on a work surface to release some air bubbles, and carefully place them in the oven. Bake for 18-20 minutes.
- To check if your cupcakes are done, use a toothpick or a wooden skewer and poke the center of the cupcake. It should come out clean with a couple of crumbs. If there is still wet batter, bake it for 2-minute increments until it is ready.
- Remove cupcakes from the oven, and let them cool in the pan for 5 minutes. After, remove from the pan and let them fully cool on a cooling rack.
Make Buttercream:
- With an electric hand mixer or stand mixer, whip the softened vegan butter on medium-high speed for 2-5 minutes until creamy.
- Add the vanilla extract and sifted powdered sugar in batches until fully incorporated. Scrape down the bowl with a spatula if needed.
- Beat on high for about 1-2 minutes until you get a nice smooth and fluffy consistency. It should be stiff enough to hold its shape but soft enough to pipe through a piping bag. If it’s too stiff, add a tablespoon of non-dairy milk at a time to loosen it. If it’s too soft and too greasy, add more powdered sugar.
- Fit a piping bag with a medium round tip and fill up half the bag with buttercream. Try to massage the bag to remove any air bubbles. Set aside until ready to use.
Assembly:
- First, line a baking sheet with parchment paper and clear a space in the fridge large enough to fit the baking sheet.
- Next, this is the time to remove the cupcakes from any paper or silicone cupcake liners. Trim the rounded tops of the cupcakes so that they’re flat. I like to get on eye-level so I can see if it’s leveled evenly. You’ll be flipping them over because this will be the base of the cauldron.
- In a microwavable safe bowl, melt the chocolate and coconut oil together. Whisk until smooth and well combined.
- This part will get messy. Working with one cupcake at a time, use your non-dominant hand to hold the top and bottom of the cupcake. With your dominant hand, spoon the melted chocolate all-around the sides of the cupcake, avoiding the top and bottom. Shake off any excess chocolate and place them on the parchment-lined baking sheet. Repeat for the rest. See notes
- Transfer the chocolate-covered cupcakes to the fridge to allow the chocolate to harden and set.
- Meanwhile, fill a small piping bag with the leftover chocolate. On another piece of parchment paper, draw twelve ½-inch circles, these will be the handles. Place this in the fridge as well to set. Leave the leftover chocolate out at room temperature, we will need this later.
- Once the chocolate has been set, remove the cupcakes from the fridge. Use a small sharp knife to carve a hole, reaching half-way inside of each cupcake. Fill each one with the chocolate pudding.
- With the last remaining bit of melted chocolate (if it has solidified, melt them again in the microwave). Use a bit of melted chocolate to stick the round handles onto the sides of the cupcakes.
- Pipe dollops of buttercream over the top of each cupcake and finish it off with some gold sprinkles. Serve and enjoy!
Notes
- Measure your flour correctly. I test my recipes, 100% in grams. A common reason baked goods fail is incorrectly measured flour. I always recommend using a scale for accuracy when baking. This greatly improves your chance for success and lessens room for error.
- If you measure by cups, avoid scooping the measuring cup directly into the flour. This tends to pack the flour into the cup, resulting in too much flour and a very dense or gummy finished product. Instead, aerate your flour (fluff it with a fork or spoon) and then spoon it into your measuring cups, leveling it with your finger or the back of a butter knife. Keep in mind though, that this method is not guaranteed to be accurate.
- Dutch-Process Cocoa Powder. This recipe specifically was made for this type of cocoa powder. If you use a different type, it might turn out different. Please check out this page where I talk about the differences between Dutch-Process Cocoa Powder vs. Natural Cocoa powder and how to use them properly in baking.
- Schedule your day accordingly. These cauldron cakes do take a bit of time to make, so if you’re making these for an event, I highly suggest making these a day ahead, or clear your schedule and start early.
- Follow the recipe accordingly. The recipe is divided up into sections, and for good reason. I’ve written this recipe so that while you’re waiting for something to bake or cool, you can be prepping something else. It makes assembly easier.
- Use a silicone pan or silicone cupcake liners. Using silicone cupcake pans/liners are not only reusable but since the batter doesn’t stick to silicone as they bake. As a result, they come out having a smooth exterior. Unlike paper liners, the batter will bake onto them and they also will have ridges, which don’t look as nice for a final product. However, you don’t need to go out and buy a silicone cupcake pan or liners, but if you do use the paper liners, just keep in mind that they will look a bit different.
- Make space for a baking pan in your fridge. We will need the chocolate coating to set in the fridge, and the way to do this is to carefully transfer the cakes is to put them on a parchment-lined baking pan. So do this before you start assembling your cauldron cakes.
- Use your hands to hold the cupcakes as you coat them with chocolate. This will undoubtedly get messy. I’ve tried using a fork and a chopstick to hold the cakes as I did this, but I found that it kept sliding off. I also find it a little difficult to roll the cupcakes in the melted chocolate because it gets hards to handle once it's in there. So I just used my hands for more stability. You can wear food-safe gloves if you prefer.
- Pudding. You'll have a lot of pudding leftover, but honestly, you can save the rest as a snack. I could not stop eating it!
- Drag your friends or family to help! Since this recipe takes a bit of time, it’s nice to have a couple of your friends or family help you out. Create an assembly line, one can coat the cakes with chocolate, while another can fill it up with pudding, etc. Make it fun!
- Storing. Keep these cakes in the fridge and in a large air-tight container. They will last for about a week.
Leave a Reply