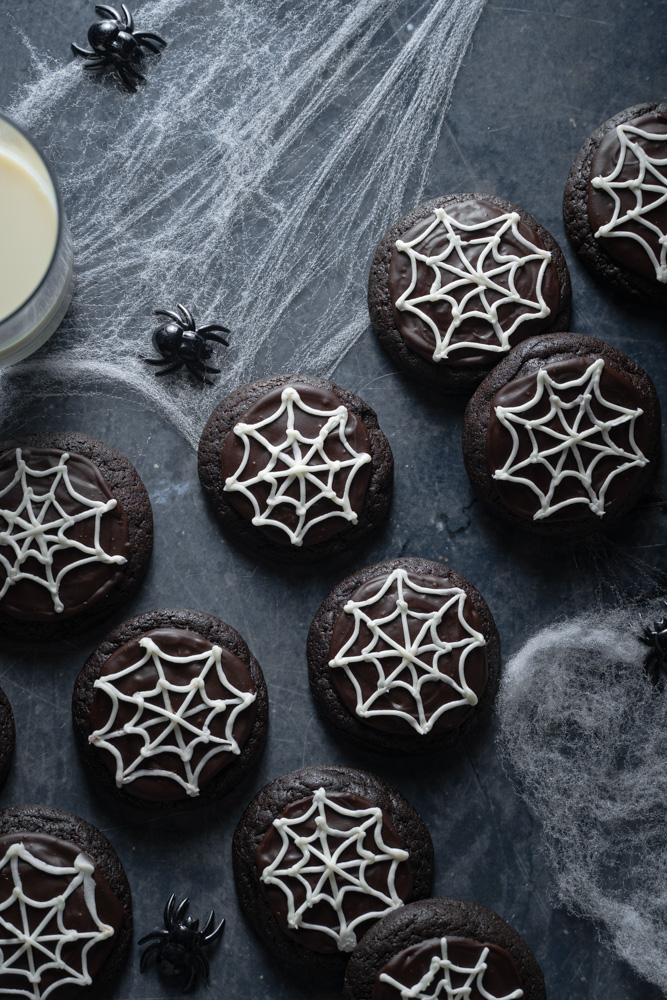
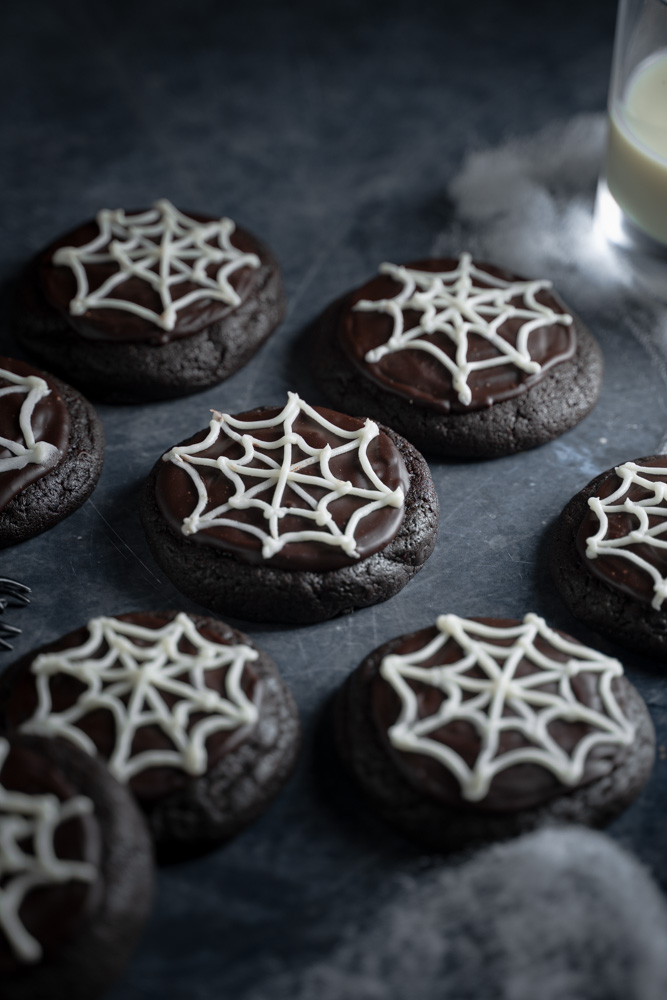
Surprisingly, it's October again and that means it's spooky season, and these vegan Halloween spooky cookies are the perfect treat to kick off with. Deliciously soft and chewy chocolate cookie base, chocolate ganache, and topped with a royal icing spiderweb! Did I mention that these taste like Oreo? Easy to make, only requires a few pantry-friendly ingredients, and is great for all ages to enjoy! It’s the perfect dessert for those who love chocolate and all things Halloween!
The inspiration
If you can’t tell already, the idea behind this cookie is to create something like a Crumbl cookie – to take inspiration! And of course, to make it vegan. If you don’t know what Crumbl is, it’s a popular cookie bakery in the U.S. Anyway, I wanted to take Halloween as an opportunity to make my very first Crumbl-style cookie. The base is a black cocoa base, which means it tastes like Oreo! Then, I added a thick chocolate ganache. And finally, piped a delicate spiderweb over the top. I did make them smaller than Crumbl’s but, believe me, the size doesn’t matter because it tastes so good.

So, how did I create a Crumbl-style cookie, if I have never had it? Simple, I had my husband explain to me, in detail, what the cookie tasted like. Particularly, the texture of the cookies, the type of toppings they used, the size, etc. After many attempts, I finally created my base for these Crumbl-style cookies! They are undeniably Soft, chewy, and packed with great flavor!

Top tips for making vegan Halloween spooky cookies:
- Weigh your ingredients! Evidently, a common reason baked goods fail is incorrectly measured flour. I always recommend using a scale for accuracy when baking. Without a doubt, this greatly improves your chance for success and lessens room for error. And for that reason, my recipes are 100% tested in grams.
- Start with softened butter. Allow your butter to sit out at room temperature for 30 minutes to an hour to soften. This recipe won’t work with melted or cold butter.
- Use an electric hand mixer or stand mixer. Creaming the butter and sugar will take a lot of arm work, so to make things easier use an electric hand mixer!
- Allow the cookies to cool before decorating. This will just ensure that the chocolate will not melt off.
- Have fun! Decorate these cookies however you would like! Invite your friends and family for a Halloween cookie decorating day.
Ingredients you’ll need for vegan Halloween spooky cookies:
- Vegan butter, softened
- White sugar
- Brown sugar
- Vanilla Extract
- Dairy-free milk
- All-purpose flour
- Black cocoa powder
- Baking powder
- Baking soda
- Salt

If you like this recipe, you might want to check these out:
If you’d tried this recipe out let me know in the comments! Don’t forget to follow me on Instagram @flouredframe and don’t forget to tag me when you create my recipes! Happy baking!
📖 Recipe

Vegan Halloween Spooky Cookies
Equipment
- Measuring spoons
- Stand mixer or electric hand mixer
- Mixing bowls
- Rubber spatula
- Medium cokie scoops
- Parchment Paper
- 2 Rimmed baking sheet
- Wire cooling rack
- Piping bag
- Medium piping tip
Ingredients
Cookies
- 140 grams vegan butter (softened at room temperature)
- 300 grams all-purpose flour
- 25 grams black cocoa powder
- ½ teaspoon baking powder
- ¼ teaspoon baking soda
- ½ teaspoon salt
- 100 grams white sugar
- 100 grams brown sugar
- 90 grams non-dairy milk (lukewarm)
- 1 teaspoon vanilla extract
Ganache
- 60 grams Semi-sweet Baker's Chocolate (chopped)
- 30 grams non-dairy milk
Royal Icing
- 80 grams powdered sugar, sifted
- ½ teaspoon vanilla extract
- 2-3 teaspoons non-dairy milk
Instructions
Cookies:
- First, set out your butter from the fridge to soften at room temperature. Depending on what brand you are using this could take from 30 minutes, up to an hour. Do not start this recipe with cold butter.
- While you wait, preheat the oven to 350° F and line two large baking sheets with parchment paper. Set aside until ready to use.
- Next, in a medium-sized bowl whisk together the flour, black cocoa powder, baking powder, and baking soda. Set aside until ready to use.
- In a large bowl, using a stand mixer or hand mixer, on high speed, cream the softened vegan butter, white sugar, and brown sugar together until fluffy.
- To the bowl, add in the lukewarm non-dairy milk and vanilla extract. The mixture will look like it won’t mix properly, but that’s fine.
- Then, add the dry ingredients to the wet ingredients, and mix them at low speed. You are looking for soft cookie dough consistency.
- Scoop the cookie dough in roughly 2 tablespoon scoops out onto a parchment-lined baking tray, aiming for around 14 cookies. I used a medium-sized cookie scoop.
- Roll them into a ball and gently flatten them into a thick disc.
- Bake for 18 minutes. Remove from the oven and let it cool on the pan for 10 minutes. Then transfer to a wire rack to finish cooling. Allow the cookies to completely cool before decorating.
Ganache:
- In a heat-proof bowl, combine the chocolate and the non-dairy milk. Heat in the microwave for 30 seconds, and mix it. Heat it once more for 30 more minutes, and stir until all the chips have melted and you have a smooth and thick consistency. Set aside until ready to use.
Royal Icing:
- In a small bowl, add in the sifted powdered sugar, vanilla extract, and non-dairy milk.
- Whisk until well combined. It will look like it won’t mix well at first, but that’s normal. Continue to whisk until it does. You should get a pretty thick consistency. If not add more powdered sugar.
- Fit a small piping tip into a piping bag, and pour the icing into it. Set aside until ready to use.
Assembly:
- Working with one cookie at a time, take about a tablespoon of the ganache and dollop it over the cookie. Gently smooth it over with an offset spatula or a butter knife. Repeat for the rest. Allow the chocolate to harden before moving on.
- Next, piping your royal icing into spider webs or whatever design you want over the chocolate. Repeat for the rest. Allow the icing to set before serving. Enjoy!
Notes
- Measure your flour correctly. I test my recipes, 100% in grams. A common reason baked goods fail is incorrectly measured flour. I always recommend using a scale for accuracy when baking. This greatly improves your chance for success and lessens room for error.
- Store in an airtight container. It can be left at room temp for a couple of days.
- They will also be kept in the freezer, undecorated, for about a month.

Leave a Reply