Guys, it's May 4th, and guess what that means. It's Star Wars day! May the FOURTH be with you, heh. Don't be fooled, these are not gingerbread! Instead, these cookies are flavored with delicious mocha, a new flavor I decided to try for this recipe! They're vegan, crisp, deliciously flavored, and super fun to make. Pair these vegan wookie cookies with a glass of Bantha boba milk tea, and you'll be set.

I love watching Star Wars, my husband and I love rewatching the whole series every year. It's becoming a tradition for my nerdy family. And for this year, to celebrate Star Wars day, I decided to make a fun and fairly easy recipe. Enter… the vegan wookie cookies! So if you're planning a Star Wars-themed party, you need to make these cookies!

Top Tips for making vegan wookie cookies:
- Use a food scale. If you've been following me, you know I highly suggest using a food scale. It's more accurate than using cups, and for a recipe like this, you want to measure the ingredients accurately. If your cookies turned out different, it could be how you measured the ingredients.
- Start with softened butter. Before you start, make sure to remove the butter from the fridge and allow it to soften at room temp.
- Use a stand mixer or electric hand mixer. This cookie dough is quite thick, so to make things easier I highly suggest using a machine. You can use your hands, but it'll take a bit of arm strength.
- Chill the cookie dough. The cookie dough will be too soft to roll out. Chilling the dough will help with rolling it and cutting it out.
- You can keep the cookie dough in the freezer for a couple of days!

Tips to decorate wookie cookies:
- Use a fork for the fur. Before you bake, lightly press a fork into the cookies to create the fur.
- Allow the cookies to cool on the baking sheet. After baking, you'll notice the cookies will be soft. They'll crisp up as they cool.
- Cool your cookies before decorating. Before you start decorating your cookies, you want your cookies to be 100% cooled. Otherwise, the chocolate will not set properly.
- Yoda is optional. If you haven't used fondant before this might take a bit of time to learn. However, if don't have the time, you can skip creating the Yoda heads. They are quite time-consuming, but they are pretty cute to make. Do whatever fits your time and schedule!
Use whole almonds or pecans. If you're planning to make Chewbacca hold Yoda, make sure to use a whole almond or pecan to fold his arms around it. - Gently fold the arms. Folding the arms can get quite tricky, the arms could break off while you do this. If it does, just gently mold it around the almond or pecan.
- Other options for decorating! If you don't want to deal with melting chocolate, you can use more vegan-friendly fondant, royal icing, or buttercream frosting!
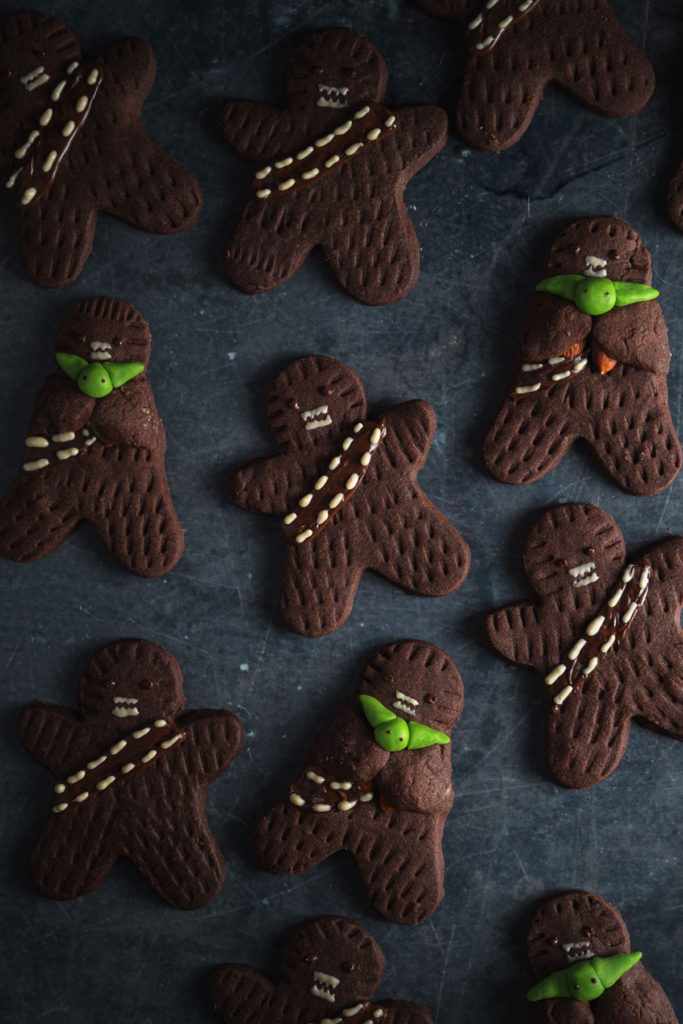
These cookies are absolutely adorable, and if you love Star Wars as much as I do, you’ll definitely enjoy this recipe. Obviously, you don’t need to make these just for Star Wars day, you can make this for any party, Christmas cookie box, or even as a gift to your favorite Star Wars fan! Also, pair this with my Blue Boba Milk Tea (aka Bantha Boba Milk Tea) recipe for a fun Star Wars treat!

If you enjoyed this recipe, be sure to check these out:
If you’d tried this recipe out let me know in the comments! Don’t forget to follow me on Instagram @flouredframe and don’t forget to tag me when you create my recipes! May the force be with you!
As an Amazon Associate I earn from qualifying purchases.
📖 Recipe

Vegan Wookie Cookies
Equipment
- Food scale highly recommended
- Mesh Sieve
- Mixing bowls
- Stand mixer electric hand mixer
- Fork
- Spatula
- Gingerbread people cookie cutter
- Parchment Paper
- Rimmed baking sheet
- Wire cooling rack
- Piping bag
Ingredients
- 224 grams vegan butter (softened at room temp)
- 120 grams powdered sugar
- 288 grams all-purpose flour (see notes)
- ½ teaspoon salt
- 30 grams Dutch-processed cocoa powder
- 1 tablespoon instant espresso
- 1 teaspoon vanilla extract
Yoda
- Green fondant (I used Wilton (vegan friendly) )
- Whole almonds or pecans
Decorations
- ½ Semi-sweet Baker's chocolate (melted)
- 45 grams Powdered sugar
- 1-2 teaspoons non-dairy milk (add one teaspoon at a time)
Instructions
Making the cookies:
- Before starting, remove butter from the fridge and allow it to soften at room temp. About 20-30 minutes. In a large mixing bowl, sift together the all-purpose flour, salt, and cocoa powder. Set aside until ready to use.
- In another small bowl, combine the vanilla extract and instant espresso. Mix until dissolved. Set aside until ready to use. In the bowl of a stand mixer (or in a separate mixing bowl), cream the softened butter and powdered sugar at low speed. Mix until creamy and well combined. Next, reduce the speed and slowly add in the dry ingredients. Mix until all the ingredients have been combined into a dough.
- Transfer the cookie dough onto a work surface and lightly knead it until it becomes a smooth and cohesive dough. Shape the cookie dough into a 1-inch thick disc. Cover with plastic wrap and chill in the fridge for about 1 hour or in the freezer for 30 minutes.
- Preheat the oven to 350° Fahrenheit, and line two large baking sheets with parchment paper, or with a Silpat mat. Transfer the chilled dough to a work surface and allow it to soften for about 15-20 minutes at room temp. Don't allow it to get too soft, as it might stick to the work surface and it'll be harder to work with. Just soft enough to roll out.
- Generously flour the work surface, and remove the cookie dough from the plastic wrap. Lightly flour the top of the dough and your rolling pin.
- Roll your dough by starting from the center and working outwards in all directions. Occasionally turn the cookie dough and while adding a bit of flour underneath so it doesn’t stick to the work surface. Roll out the dough to ¼ inch thickness.
- Cut out your cookies with a gingerbread man cookie cutter. Remove any excess dough, and reuse them later! Flour a thin spatula, gently and carefully slide it under the cookies (if you floured your work surface well, you should have no problem with any sticking), and transfer it to the baking pan. Leaving about 1-inch in between each cookie.
- With a fork, lightly press it into the cookie to create Chewbacca's fur. Optionally, if you're adding Yoda, carefully wrap the almonds or pecans with Chewbacca’s arms and press firmly but not so firmly that the arms break. If you’re not adding Yoda, you can skip this step. Bake the cookies for 12 minutes.
- Remove the cookies from the oven, and allow them to cool on the baking pan for a few minutes before transferring to a wire rack to cool completely before starting any decorations
Yoda (Optional)
- If you’re planning to make Yoda, you can start creating his head and ears while you wait for the chocolate to set with the green fondant. Firmly add Yoda's head above Chewbacca’s arms, and with a toothpick, dip it in chocolate and add his eyes. Serve, and enjoy!
Finishing touches (Optional)
- Melt the semi-sweet chocolate in the microwave on high in 20-second intervals, while stirring in between, and pour the chocolate into a piping bag.
- Cut a small hole at the end of the piping bag, and draw the base of Chewbacca’s bandolier. Repeat for the rest. Allow the dark chocolate to set before moving on to the next step. If you have room, you can place the cookies in the fridge to make the process go by quickly.
- When the dark chocolate has set, melt the white chocolate and pour it into another piping bag. Cut a tiny hole, and carefully pipe Chewbacca’s ammunition on his bandolier.
- Make the royal icing by mixing the powdered sugar non-dairy milk in a small bowl. It should flow slightly, but still hold its shape. Transfer the icing to a piping bag with a small round tip. Draw on his teeth, you can use a toothpick push the icing to get a more defined shape to his teeth. Then pipe Chewbacca’s ammunition on his bandolier.
Notes
- Measure your flour properly. I always weigh my ingredients with a food scale because it is more accurate than cups. But here is a video for those who only have cups to measure, click here to watch.
- Why do you need to properly weigh flour? The risk is that you could be adding too much flour without knowing, and adding too much flour could make these cookies too dry. This is why I highly recommend using a food scale!
- Use a stand mixer or electric hand mixer. This cookie dough is quite thick, so to make things easier I highly suggest using a machine. You can use your hands, but it'll take a bit of arm strength.
- Chill the cookie dough. The cookie dough will be too soft to roll out. Chilling the dough will help with rolling it and cutting it out.
- Yoda is optional. Creating the Yoda heads is a bit laborious, which is why I made it an option. Do whatever fits your time and schedule!
- Icing: If your icing is too thick, add one teaspoon of milk to get the right consistency, if it's too thin, add more powdered sugar. You're looking for a pretty thick consistency that can hold it's shape, but is also still easily pipeable.
- You can keep the cookie dough in the freezer for a couple of days!



Leave a Reply