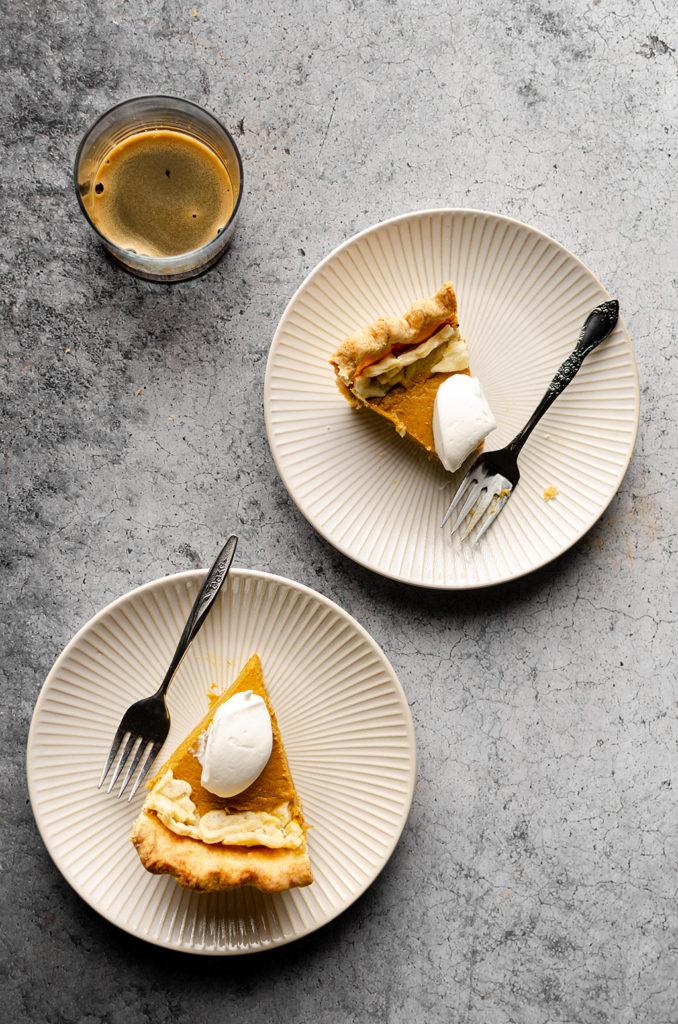
Thanksgiving dinner would not be complete without a good pie, and I wanted to go with the classic, pumpkin pie! I’ve always enjoyed eating pumpkin pie during this time of year, it just fits the season. Don’t you agree? Think about it, would Thanksgiving dinner be complete if there wasn’t a pumpkin pie? But I think it should also be enjoyed throughout the fall season!

I know that during Thanksgiving, everyone will be busy in the kitchen. So to save you some time in the kitchen, I highly suggest making this pie a day or 2 before. The pie needs time to set overnight! It will still be just as good, just keep it wrapped!
For the crust, I always make mine from scratch and if you have the time, it's actually pretty simple to make. All you need is flour, salt, sugar, butter, and ice cold water. This will create the flakiest crust, which complements this pie perfectly. However, I understand that some of us don’t want to add an extra thing to our list of things to make, so you do have the option to get a store-bought pie crust. Just make sure to read the ingredients list to ensure that it is vegan!

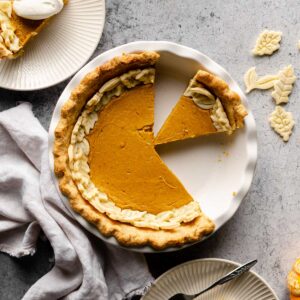
After many attempts, year after year, I’ve finally perfected this recipe. This pumpkin pie is creamy, smooth, and perfectly flavored. We seriously can’t get enough, you can’t tell that this is even vegan! So make this pie, share it with family and friends, and indulge this holiday season (or anytime you want a pumpkin pie!).

If you’d tried this recipe out let me know in the comments! Don’t forget to follow me on Instagram @flouredframe and don’t forget to tag me when you create my recipes! Happy baking!
If you enjoyed this recipe, check these out:
As an Amazon Associate I earn from qualifying purchases.
📖 Recipe
Vegan Pumpkin Pie
Equipment
- Food processor
- Rolling Pin
- Plastic wrap large reusable zipped bag
- 9-inch pie plate
- Parchment Paper
- Pie weights or dry beans
- Pie edge protector or aluminum foil
- Kitchen scissors
- Mixing bowls
- Whisk
- Offset spatula
- Leaf cookie cutters optional
Ingredients
Pie Crust
- 2 sticks Vegan butter (cold and cubed)
- 320 grams All-purpose flour (plus more for dusting)
- 1 tablespoon Granulated sugar
- 1 teaspoon Salt
- 6-7 tablespoons ice cold water (or more)
Pumpkin Pie Filling
- 160 grams Sweetened condensed coconut milk
- 120 grams Full-fat coconut milk (canned)
- 1 teaspooon Pure vanilla extract
- ½ teaspoon Salt
- 2 ½ teaspoon Pumpkin pie spice
- 425 grams Pumpkin puree (not pumpkin pie filling)
Instructions
Pie Crust
- Before starting, cut the butter into cubes and set it in the freezer for 15 minutes. Then, in a measuring cup combine some ice and water. You’ll need enough water so you can measure out 6-7 tablespoons from it.
- In the bowl of the food processor, combine the flour, sugar, and salt. When the butter is frozen, add it to the dry ingredients. Pulse until you get pea-size pieces of butter.
- Next, run the food processor on low, and add the ice water, 1 tablespoon at a time until it starts to slightly clump together. Depending on your flour, you might need more or less water. You don’t want the dough to be too wet or too dry. I used 7 tablespoons of water.
- Once the dough starts to clump together, stop there. Don’t pulse any further or you’ll start working the gluten. Transfer the dough to a work surface, and lightly knead with your hands until you get a cohesive dough. Shape the dough into a 1-inch disk and wrap it in saran wrap or place it into a reusable zip bag. Place it in the fridge to chill for an hour.
- When your dough is cold, transfer it onto a liberally floured work surface. Flour the top of the dough and your rolling pin. Roll your dough by starting from the center and working from the center and outwards in all directions. Occasionally turn and flour the bottom of the dough so it doesn’t stick to the work surface. The dough should be around ¼ inch thick and at least 3-4 inches larger than your pie pan. (See notes)
- Gently lift the pie crust from the work surface by wrapping it onto the rolling pin. Starting from one end to the other end. Transfer and gently unwrap the pie crust over the pie pan, leaving about 2-inches of crust hanging over the edge of the pie pan. Let dough gently drop into the bottom and sides of the pan. Smooth out any wrinkles with fingertips.
- Take a pair of kitchen shears or a paring knife and trim the excess crust hanging over. Leaving about 1 ½-inches of the crust. Fold the edge under and crimp it with either your fingers or the tines of a fork. Chill in the freezer for 30 minutes to an hour. Meanwhile, preheat the oven to 400° Fahrenheit. (See notes)
- When the dough is cold, use a fork to prick the bottom of the crust. Place a piece of parchment over the crust and cover the bottom with the pie weights or dry beans. Place the pie pan onto a large baking sheet. (See notes)
- Bake the crust for 12 minutes. After 12 minutes, carefully remove the pie crust and gently remove the parchment paper and pie weights. Place the crust back into the oven to bake for another 10 minutes. Remove from the oven. The crust should be dried out and starting to brown. Allow the crust to cool before adding in the filling. Reduce the oven temperature to 350° Fahrenheit.
Pumpkin Pie Filling
- In a large mixing bowl, whisk together the sweetened condensed coconut milk, full-fat coconut milk, and vanilla extract until they are well combined. After that, sift in the cornstarch and whisk it in together. Then, add in the salt, pumpkin pie spice, and pumpkin puree. Continue to whisk the mixture until all ingredients are well combined.
Bake
- Pour the pumpkin pie filling into the blind-baked pie shell. Smooth out the top with an offset spatula and brush the edges with a bit of non-dairy milk. Cover the edges with the a pie crust protector or aluminum foil, and place the pie in the oven. Bake for 45-50 minutes.
- Once the time is up, leave the pie in the oven and turn it off. Open the oven, just a crack, and allow the pie to cool inside for about 25-30 minutes. This will prevent the pie from cracking. The pie should slightly wobble in the middle. (See notes)
- Remove the pie from the oven, and let it get to room temperature. Then place it in the fridge to set, about 4 hours. For best results, allow it to sit overnight. When it is time, serve it with a dollop of vegan whipped cream and enjoy!
Notes
- You can buy premade crust! If you would prefer not to make a crust, which is totally fine, you can buy a premade crust. Just make sure to read the ingredients to make sure it is vegan! You will still need to blind bake it before you add the filling!
- If you’re living in a warmer climate, this will make the crust just a bit difficult. You will need to work quickly and efficiently because you want to keep your dough cold at all times. If you ever feel like your dough is getting too warm and soft, set it back in the fridge to chill.
- If you do not have a food processor, you can use a pastry blender, a fork, or even your hands. If you are using your hands, you will need to work quickly, as the warmth of your hands will cause the butter to melt. If you ever feel like your dough is getting too warm and soft, set it back in the fridge to chill. I chose to use a food processor because it is more efficient, and I will be handling the dough less. Keeping the butter cold at all times.
- If your dough is showing signs of cracks, it is a sign of underhydration. If your dough is too wet or tacky to the touch, it is a sign of overhydration.
- If your dough is too cold to work with, allow it to sit at room temp for 5-10 minutes until it is easier to work with. Don’t let it get too soft.
- Chilling the crust before baking will prevent it from shrinking too much.
- Placing the pie pan on a large baking sheet will not only make it easier to transfer the pie in and out of the oven, but it also distributes the heat evenly throughout the bake.
- If your oven won’t stay open, you can place a wooden spoon in between.


Leave a Reply