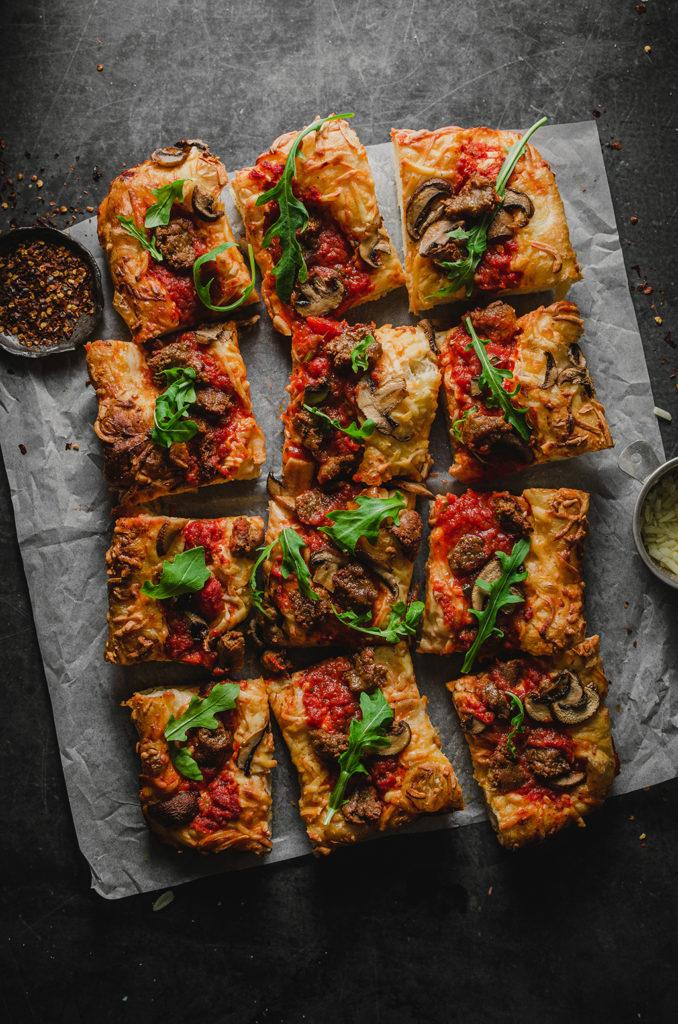
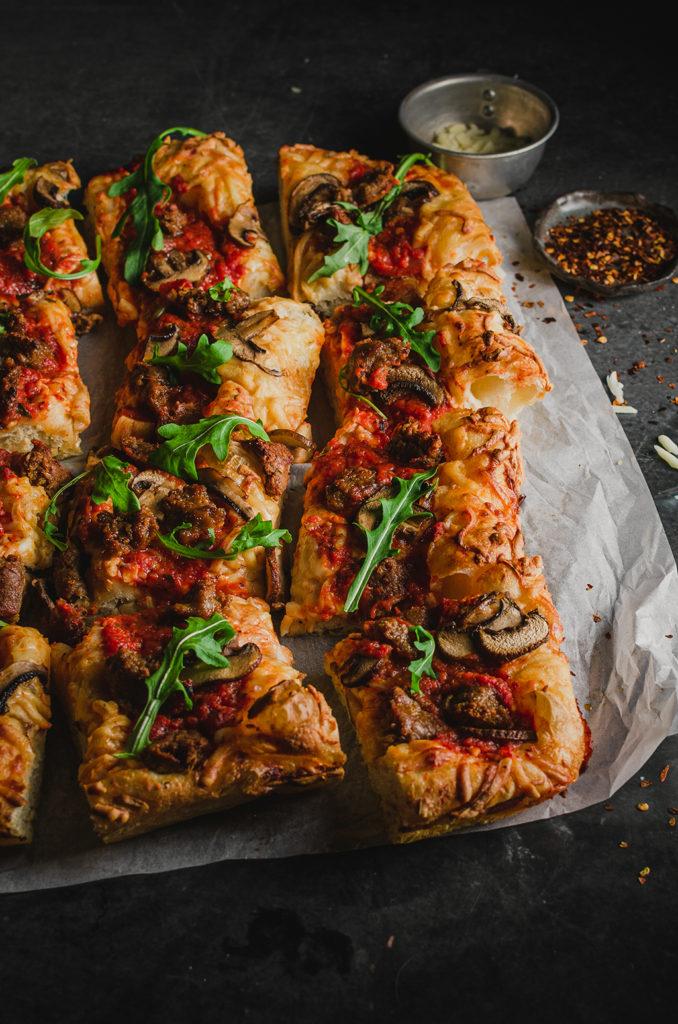
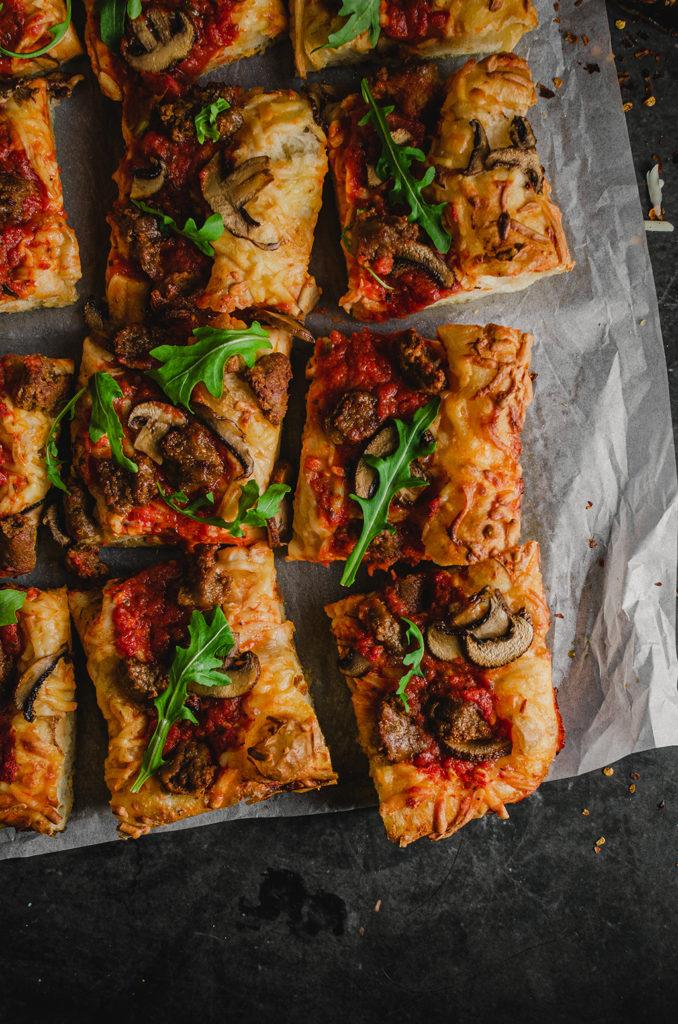
You’ve probably heard of Chicago-style pizza or Neapolitan pizza. However, chances are you’ve never heard of Detroit-style pizza and let me tell you, it's worth trying out. The crust is tender-yet-chewy and super crisp and topped with sauce and melty vegan cheese. This vegan Detroit-style pizza is perfect for beginners, and doesn't take long to make! It's a no-knead pizza, so it doesn't require any special equipment, seriously, how great is that?
What is a Detroit-style pizza?
When you think of pizza, you instantly think of the perfectly round ones. Well, Detroit-style pizza, is very different and even simpler to make. Here's what makes up a Detroit-style pizza:
- Thick, tender-yet-chewy, and super crisp crust. Almost focaccia-like!
- Rectangular shape. They're usually baked in a rectangle pan.
- First cheese, then tomato sauce. The cheese acts as a barrier between the sauce and the dough.
- A cross between a Chicago-style pizza and a Sicilian pizza.
My husband loves this pizza, most especially, the crust. Compared to regular pizza, it's light, chewy, and crispy. Now, don't get me wrong, I love a good thin crust pizza as much as the next big foodie out there. However, for the average home cook, that can be hard to replicate. This pizza can be easily made with just a few things at home.
Here's what you need to make a vegan-Detroit-style pizza:
- A large bowl and your hands - Yes, you'll be making this dough with your hands. It's easy don't worry! This is good practice to learn how to feel the dough.
- 9x13-inch sheet pan - This will give you the thick-crust and its iconic shape.
- Bread Flour - The amount of protein in bread flour is ideal for gluten development. High protein content can absorb more liquid and allow it to hold its shape better.
- Extra Virgin Olive Oil - Not only does it add flavor to the dough, but you'll need extra to grease the pan, and this will also help get a crisp bottom.
- Toppings - Since this recipe solely focuses more on the crust, I made it easier for you. Buy your favorite pizza sauce, vegan cheese, and other toppings! Ensure all these toppings are vegan of course!
Other things to note about making vegan Detroit-style pizza:
- Weigh your ingredients. So, for a recipe like this, I will require you to use a food scale. This needs precise measurements, and unfortunately measuring cups are not accurate.
- High-hydration dough. This is based on my focaccia bread recipe, however, I reduced the hydration to 75%. Still pretty high, but it still gets you a nice thin and crispy crust.
- Stretch and folds. This is a no-knead dough, but we still need to develop the gluten. To do that, we will perform stretch and folds. This process is a gentle way to develop gluten and incorporate air into the dough. With how wet this dough will be, it will be impossible to knead by hand. Click here to watch a video from King Arthur on how to perform a stretch and fold.
- Cold fermentation. Optional, but highly recommend. This simply means to place dough in the fridge to proof for 12-16 hours. This slows down the yeast, and it will produce a more flavorful dough. I would do this when the dough is shaped into the pan. And then prep and bake the next day.

If you tried this recipe, let me know what you think in the comments below! You can also share it with me on Instagram, just tag @flouredframe. I would love to see your recreations! Happy baking!
If you liked this recipe, check these out:
As an Amazon Associate I earn from qualifying purchases.
📖 Recipe

Easy Vegan Detroit-Style Pizza
Equipment
- Mixing bowls
- Damp cloth
Ingredients
- 315 g warm water
- 2 teaspoons active dry yeast (see notes)
- 438 g bread flour (leveled and sifted)
- 1 ½ teaspoon kosher salt
- 30 g extra virgin olive oil (plus more for greasing)
- Vegan Mozzarella (I used the So Delicious Brand)
- Vegan Marinara/Pizza sauce
- Your favorite toppings (I used Beyond sausage, fresh mushrooms, and fresh arugula)
Instructions
Making the dough:
- Combine warm water and active dry yeast in a small bowl. Stir to dissolve the yeast, and set aside for 10 minutes to bloom. It should get frothy and smell very yeasty.
- Meanwhile, combine the bread flour and kosher salt, in a large bowl. When the yeast is ready, add it to the bowl along with the extra virgin olive oil.
- Using your hands stir the ingredients together until no dry flour remains in the bowl and a cohesive mass forms. Cover the bowl with a damp cloth or plastic wrap, for 20 minutes to rest. See notes
- After 20 minutes, grease your hands with a bit of olive oil. Perform a stretch and fold by grabbing a “corner” of the dough in the bowl. Gently lift it straight up to stretch the dough as high as it will go without tearing and fold over to the other side. Rotate the bowl and repeat 3 more stretch and folds, cover and let it rest for another 30 minutes. Repeat this 2 more times, with a 30-minute rest in between. You’ll perform three sets of stretch and folds in total.*
- *After each set of stretch and fold, the dough will start to tighten up, which is an indication of gluten development. And after the 3rd set of stretch and folds, you’ll notice that the dough is smoother than when you first started.
Shaping and proofing:
- Prep a 9x13-inch baking pan by drizzling olive oil until the bottom is covered. You’ll need this to be heavily greased so that the dough will not stick to it.
- After the last set of stretch and fold, turn the dough over onto itself, so that the bottom is now on the top, and transfer it to the greased sheet pan.
- Next, with oiled hands, work the dough to the edges by gently stretching it. If the dough is springing back, cover and let it rest for 10-15 minutes to allow the gluten to relax before gently working it to the edges again.
- Grease the inside of plastic wrap and cover the dough. This will make it so that the plastic will not stick to the dough. Proof the dough for another 30-45 minutes.*
- Meanwhile, adjust the racks in the oven. Place one on the bottom and one at the top. Then preheat the oven to 450° Fahrenheit.
- * Optionally, you can do a cold fermentation by allowing the dough to proof in the fridge for 12-16 hours. This will develop more flavors to the dough. Let it sit at room temp for 30 min - 1 hour before moving to the next step. This is the time to preheat the oven to 450° Fahrenheit.
Add your toppings:
- Cook any vegan meat substitutes before adding it to the dough. I find that it cooks better when you do it first, rather than relying on the oven to cook it.
- When your dough is ready, sprinkle first with cheese, spreading it right to the edge. See notes
- Next, drizzle your pizza or marinara sauce over the cheese, making sure to leave areas of cheese exposed. Add your favorite toppings, I used fresh mushrooms and crumbled up some Beyond sausage.
Bake and serve!
- First, bake the pizza on the bottom rack for 20 minutes. This will create a nice crispy bottom.
- Next, transfer it to the top rack and bake for another 5 minutes. This cooks the toppings and melts the cheese. Keep an eye on it just in case the toppings burn.
- Remove from oven, and allow to cool for 10 minutes. This is the time to add any of the leafy green toppings, like arugula or basil. Serve and enjoy!
Notes
- If you're making this pizza for the first time, I highly suggest start making the dough at least 3 hours ahead of when you are planning to eat. Give yourself time to learn how to make the dough properly.
- How to tell if your yeast has bloomed. It should smell very yeasty, and a bit foamy at the top. Make sure your yeast is active.
- If you’re wondering if your yeast is alive, good news, you can easily test it out. Combine about ¼ of warm water with a ½ teaspoon of sugar, and then mix in about a ½ teaspoon of yeast. (Yeast loves to feed on sugar!) Allow it to sit for 10 minutes, and it should be bubbly, foamy, and smell very “yeasty”. If you don’t see any sort of activity, it’s probably dead. Get yourself some fresh yeast.
- Baking pan. This recipe is fitted for a 9x13-inch pan. However, if you have a slightly smaller pan, this recipe will still work, you’ll just get a thicker bread. If you have a bigger pan, you’ll have to double the recipe.
- This recipe is fitted for a 9x13-inch pan. However, if you have a slightly smaller pan, this recipe will still work, you’ll just get a thicker bread. If you have a bigger pan, you’ll have to double the recipe.
- High hydration, sticky dough. This dough is similar to focaccia dough. And it is a very sticky and a very hydrated dough. So don’t be alarmed if your dough is not coming together as it should with a regular bread recipe.
- Using your hands will be good practice to feel the dough. Alternatively, you can use a spatula or a wooden spoon to mix the dough.
- Stretch and folds. Click here to watch a video from King Arthur on how to perform a stretch and fold. Stretch and folds are what artisan bread bakers use to improve the quality of their bread. It’s a gentle way to strengthen and develop gluten and to incorporate air into the dough without kneading. This method is perfect for a focaccia because the dough is at a very high hydration. It would be impossible to knead by hand.
- Proofing (or rise) time depends on climate. The proofing time will depend on the climate you are living in. The time in the instructions is an estimate, I made this dough during winter, so it took about 1 hour and 30 minutes. For those who live in warmer climates, it might take only an hour. So, I highly recommend paying attention to the size of the dough. If it’s doubled in size, it’s ready.
- Adding the cheese first acts as a barrier between the dough and the sauce. Since this is a high-hydration dough, the tomato sauce can easily seep into it. Causing it to get super soggy.
- Why do we need to move the oven racks? I learned this from Claire Saffitz’ focaccia recipe, she first bakes it on the lower rack to get a nice crispy bottom, then finishes it by transferring it to the top rack to get a nice golden color on the top. I just love how it came out, it was delicious and crispy all over.
- If you have a stand-mixer, and you would rather use that. You can mix the dough on medium for 10 minutes. Let it rest for 1 hour or until doubled in size. Then form the dough into the pan. Continue on with the recipe when you get to that stage.


Leave a Reply